Showing posts with label Made with Love Mondays. Show all posts

Monday, 3 March 2014

Tortelli di Carnevale - Carnival Doughnuts

Tortelli di Carnevale

Preparations for lent in Italy last much longer than the one day we have here in the UK when we eat pancakes. Italian festivities include parades and parties as well as sweet treats. The most popular Italian destination for Carnival is undoubtedly Venice for the lavish costumes and masks worn at this time. Yet almost all towns and cities in Italy have their own carnevale, with parades and floats, masks and fancy dress. Most of these take place during the weekend before Shrove Tuesday although in Milan and surrounding areas, the celebrations carry on up until the following Saturday. 

Like many other countries, the local specialities at this time of year are based around eggs/milk/butter/sugar. Exact recipes differ from town to town, and take various forms and names although the unifying characteristic is that they are fried. The little doughnuts here are from the Milan area and are surprisingly light, with a fluffy centre. If you want to be really indulgent, you can fill them with crème pâtissière which is how I used to buy them from my favourite pasticceria.

As these are made completely from scratch, I'm sending this over to Javelin Warrior's wonderful weekly challenge, Made with Love Mondays.

JWsMadeWLuvMondays

RECIPE

50g butter
50g caster sugar
125ml milk
1 teaspoon vanilla extract
grated zest of 1 lemon
150g self raising flour
4 eggs + 1 egg yolk

sunflower oil for frying
caster sugar for dredging


Put the butter, caster sugar, milk, vanilla and lemon zest in a saucepan and bring to the boil over a medium heat, stirring with a wooden spoon.

When it has reached boiling point, remove from the heat and add the sifted flour. Mix well until it forms a ball. Put this back on the heat for a minute or two, until you see a thin white coating on the bottom of the pan.

Remove from the heat and transfer the mixture to a bowl. Leave to cool for about 20 minutes.

When it has cooled, start adding the eggs and extra yolk. Mix them in one at a time, beating vigorously - make sure that each egg is thoroughly absorbed before adding the next. The batter should not be too thin at the end.


When you're ready to make the fritters, fill a high-sided pan about half full of oil and heat until a drop of batter sizzles when dropped in - it should be about 170º-180ºC, hot but not boiling.

Fry rounded teaspoons of batter, making sure you don't overcrowd the pan, about 5 at a time is ideal. Quickly flip them over when they are golden brown and leave them to cook for a minute on the other side.


Take them out carefully with a slotted spoon and place on some kitchen towel to absorb some of the grease. Serve straightaway, with caster sugar sprinkled liberally over. 


Carnival Doughnuts

Monday, 10 February 2014

Mini Vanilla Bundts

Mini Vanilla Bundts

I never intended buying any Bundt cake tins, mini or otherwise. Yet I came across one on offer in a shop and frankly couldn't resist, even though the cupboards in my small kitchen are already full to maximum capacity. It has got to the point where I carefully balance pans and trays on the top of the smallest stack I can see and then shut the doors as quickly as possible so that the contents don't come crashing out all over the floor.

Anyway, these were worth it. The cakes were moist and springy inside but with a slightly crisp exterior and the miniature size makes them perfect for individual treats for loved ones.

I'm entering these into a lovely new challenge (for me), Treat Petite, where you can send in any recipe as long as it's mini! A great idea and I look forward to seeing this month's entries for 'Loved Ones'. The challenge creators are Cakeyboi, this month's host and The Baking Explorer.

 
I'm also sending this over to Javelin Warrior's wonderful weekly challenge which encourages everyone to cook from scratch, Made with Love Mondays.

JWsMadeWLuvMondays

RECIPE

150g plain flour
quarter teaspoon bicarbonate of soda
125g caster sugar
pinch of salt if not using salted butter
80g butter, melted
120ml sour cream
2 eggs
2 teaspoons good vanilla extract or paste

Icing
200g icing sugar

Pre-heat the oven to 170°C

1 mini-Bundt pan, well greased

Start by sifting the flour and bicarb of soda into a bowl. Add the sugar and salt if using and mix. 

In another bowl, whisk together the wet ingredients (melted butter, eggs, sour cream and vanilla). Gently fold in the flour mixture until combined. 

Scoop the mixture in to the Bundt moulds and bake for about 25 mins. 

Remove from the oven. Leave the cakes to cool for about 5 mins before turning them carefully out on to a wire rack to cool completely.

For the top, I just made a very simple water icing with icing sugar and warm water but you can use some vanilla in this if you want to add more flavour.


Vanilla Bundts

Monday, 25 November 2013

Spiced Pumpkin and Chocolate Cupcakes


I am inordinately proud of these squidgy little mounds for a variety of reasons. Firstly, the taste - they're intensely chocolatey and lightly spiced which makes them perfect for this time of year. Secondly, the texture - you think they're going to be quite dense but actually these are celestially light and wonderfully moist. Thirdly, they last really well, indeed they taste even better the day after baking. Finally, they're a cinch to make. Last year I made a chocolate and pumpkin full size cake but made everything from scratch, including the pumpkin puree. Luckily, since then, I've been able to find tinned pumpkin puree in the local supermarket and it not only makes the whole thing so much easier, I actually think it's better because it's not so watery.

Contrary to expectation, I also feel that these little cakes can almost be classed as healthy. That wasn't my intention but as taste has definitely not been compromised, I look on it as an added bonus. There's no butter at all and only a scant amount of sunflower oil. There's a fair bit of sugar I know but come on, these are cakes after all.

In the Italian tradition, these little cakes (or muffins I suppose) are ideal for breakfast and as they're easy to eat (no icing to contend with), perfect for 'breakfast to go', this month's Breakfast Club Challenge, hosted by Utterly Scrummy Food for Families, created by Helen from Fuss Free Flavours.


As these are baked and vegetarian, I'm also entering them into Bake Fest, hosted by Cooks Joy.

BakeFest-300

They're also off to Family Foodie Challenge, created by Lou at Eat Your Veg and hosted by Vanesther at Bangers and Mash where the theme is lunchbox ideas. I think these would be perfect.


RECIPE

95g plain flour
20g cocoa powder
1 teaspoon baking powder
half a teaspoon bicarb of soda
half a teaspoon ground cinnamon
half a teaspoon ground ginger
a pinch of salt
125 ml sunflower oil
2 large eggs
210g pumpkin puree (half a can)
100g granulated sugar
90g light brown sugar

12-bun muffin tin lined with 12 cupcake or muffin papers

 Pre-heat the oven to 180°C

Start by sifting the flour, cocoa, baking powder, bicarb of soda, salt and spices into a bowl.

In another bowl, whisk together all the other ingredients (oil, eggs, pumpkin and sugar). Gently fold in the flour mixture until combined. 

Scoop the mixture in to the cases, filling each case as equally as possible (I use an ice cream scoop for this).

Put in the oven and bake for about 20-25 mins or until a cake tester comes out clean. 

Remove from the oven. Take the cakes out of the tin as soon as you can and leave to cool on a wire rack.


Thursday, 24 October 2013

Spaghetti with Tomatoes and Swordfish

Spaghetti with Swordfish

For those interested in food and drink, autumn is probably the best time to visit Italy. From Trentino in the north to Sicily in the south, the entire country is filled with festivals and feasting, from September to November. These 'sagre', celebrating fantastic local produce, are usually held over a weekend and the whole town joins in the party atmosphere. The streets are filled with stalls and tables, with everyone cooking and selling typical dishes made with whatever they happen to be celebrating. There's always a glass or two of good wine from the area to accompany the food as well - I mean, you may be eating on the hoof, off paper plates but certain dining rules must be upheld!

If you are visiting Italy in the autumn, it's definitely worth finding out what's going on in the local area as I guarantee you'll be able to find something. There are sagre dedicated to almost everything: some are based around single ingredients such as chestnuts, olive oil, honey, wild boar; others focus on a typical dish like risotto, gnocchi or pesto. One of my favourite is held in September in Asti, Piedmont and it celebrates a variety of local produce so you can try delicious tagliatelle with the famous Alba white truffle, beef braised in Barolo, risotto with porcini... It's a wonderful way of trying excellent food without paying restaurant prices. Another great sagra celebrates the end of the wine harvest in Bardolino on Lake Garda. You pay a few euros at the beginning to buy a glass which you hang around your neck in a specially made box. You then use this glass to sample the different wines from various producers who thoughtfully also prepare some local dishes to accompany the wine. It's all great fun but obviously much better if you can make sure you don't have to drive at the end of the day.

This pasta dish is a recreation of something I tried in the Sagra del Pesce Spada (swordfish), held at the end of August in Gallipoli in Puglia. It's fresh and flavourful from the tomatoes and herbs, with chunks of meaty, succulent swordfish. It's a perfect dish for late summer but I thought I'd sneak it in before the weather gets too cold, using the last of the tomatoes from my parents' greenhouse.

This post is making its way over to the ever popular challenge, Cooking with Herbs. The challenge is created and hosted by Karen from the wonderful Lavender and Lovage.

Herbs on Saturday for June: Cooking with Herbs Challenge - Win a Pot of Culinary Lavender Grains

I'm also sending it to Javelin Warrior's wonderful weekly challenge which encourages everyone to cook from scratch, Made with Love Mondays.

JWsMadeWLuvMondays

RECIPE
350g spaghetti
2 tablespoons extra virgin olive oil
300g swordfish
1 garlic clove
half a glass dry white wine
250g cherry tomatoes, roughly chopped
a bunch of parsley, chopped
a teaspoon dried thyme
a pinch of dried chilli flakes

salt and freshly ground pepper

Remove any skin from the swordfish with a sharp knife and cut into chunky strips, about 2cm x 1cm. Lightly squash the garlic clove, making sure it stays intact and heat with the olive oil in a large frying pan. When it just starts to colour, discard the garlic and add the swordfish. Fry quickly for 2 minutes, then add the wine and let it evaporate for a minute or so. Add the cherry tomatoes and some salt and pepper and cook together for a further 2-3 minutes. Finally, add the parsley, thyme and chilli flakes.

In the meantime, cook the pasta in salted water according to instructions.

When the pasta is al dente, drain quickly and mix all together with the swordfish sauce.

Spaghetti with tomatoes and swordfish

Monday, 16 September 2013

Halloumi and Roasted Peppers

Roasted Peppers and Halloumi

I suppose I have to face the fact that it's over. Linens and sandals have been relegated to the back of the wardrobe, the tan has faded, suitcases are once again gathering dust in the attic and memories of lazy, sun-filled lunches, sipping rosé, overlooking a startlingly blue Mediterranean have been firmly pushed to the back of my mind. Summer has gone and it doesn't look as though it will be back any time soon. Of course, I love autumn so my mourning won't last long, it's just that it seems to have arrived very quickly, leaving me feeling as though I haven't had a chance to properly say goodbye to summer.

This dish then is my farewell to summertime. It works well as a light lunch or as a starter. The brightly-hued, sweet-tasting peppers seem to retain the warmth of the sun that is sadly lacking at the moment and are a perfect foil for the salty halloumi; the citrussy dressing, fresh with herbs, complements both ingredients perfectly.

Go on, put those flip-flops away but make sure you've got this ready to eat afterwards. It would even go well with a glass of rosé or two...

This post is making its way over to the ever popular challenge, Cooking with Herbs. The challenge is created and hosted by Karen from the wonderful Lavender and Lovage.

Herbs on Saturday for June: Cooking with Herbs Challenge - Win a Pot of Culinary Lavender Grains

I'm also sending it to Javelin Warrior's wonderful weekly challenge which encourages everyone to cook from scratch, Made with Love Mondays.

JWsMadeWLuvMondays

RECIPE - serves 2 as a light lunch or starter

1 x 250g pack of halloumi
1 red pepper
1 yellow pepper

For the herb dressing
150ml extra virgin olive oil
a large handful of  fresh flatleaf parsley
1 teaspoon dried oregano
1 tbsp capers, drained
juice and zest of half a lemon

The dish works best when the peppers and dressing are at room temperature and the halloumi is hot so you can prepare the peppers and dressing in advance and finish the dish by grilling the halloumi just before eating. 

Start by roasting the peppers. Preheat the oven to its maximum temperature and put the peppers in whole, on a greased baking tray. Leave for about 25 mins, turning occasionally. The skins should be blackened and starting to peel away. Remove from the oven and put them in a plastic bag to cool before peeling them and eliminating the seeds and core. Slice each pepper lengthways into quarters or thirds.

For the dressing, start by roughly chopping the parsley and capers. Add to the olive oil along with the oregano, the lemon zest and the lemon juice. Shake (or whisk) everything together well. 

When you're ready to eat, heat a griddle pan until very hot. Drain the halloumi and cut into about 8 slices, brush each slice with a little olive oil and griddle for about 1-2 mins each side, until the cheese is lightly charred and beginning to soften.

Arrange the peppers and halloumi on the plates (making sure each plate has both red and yellow peppers) and spoon over the dressing.

Serve with lots of crusty bread. 


Friday, 26 July 2013

Chocolate and Pistachio Macaroons

Chocolate and Pistachio Macaroons

I do realise that macaroons are no longer at the apex of food fashion. Luckily for me, I am not a slavish follower of trends; I mean, just think of how many things I would have had to deny myself over the years simply because they were no longer 'fashionable' - prawn cocktail, black forest gateau, goat's cheese salad, chicken kiev...

Macaroons may have had their day but I stay true. Their small size and intense sweetness, coupled with the chewy yet soft texture make them an ideal way to finish a meal. They're also perfect with an espresso at any time of the day.

This particular version has been inspired by Nigella - indeed, it is a reworking of her chocolate macaroons sandwiched together with the filling from her pistachio ones. I'm including the recipe for the chocolate macaroons here because I've adapted it and you can find the recipe for the pistachio filling in Nigella's book, How to be a Domestic Goddess.

There are some fellow bloggers who make very impressive macaroons - have a look at Corner Cottage Bakery's stunningly beautiful white-on-white ones here, Blue Kitchen Bakes' delicious sounding raspberry filled ones here and Supergolden Bakes' incredibly professional ones here.

As these are perfect for parties, I'm sending them over to A Kick at the Pantry Door for July's Forever Nigella challenge, started by Sarah at Maison Cupcake.


As they are completely made from scratch, they're going to Javelin Warrior's wonderful weekly challenge too, Made with Love Mondays

125g icing sugar
60g ground almonds
15g cocoa
2 egg whites
15g caster sugar

Pre-heat the oven to 180°C

Line 2 baking sheets with greaseproof paper

Sift the icing sugar, ground almonds and cocoa powder together. Whisk the egg whites until fairly stiff then sprinkle over the caster sugar. Continue whisking until the egg whites become very stiff then gently fold in the sifted ingredients. 

If you have an icing bag (I use the disposable ones), fit with a plain nozzle and fill with the macaroon mixture. It's a little bit fiddly and the mixture is really sticky so try to get it all in the bag! Pipe out small rounds onto the prepared baking sheets. If you're not bothered about having perfect discs, you can just put small teaspoons of the mixture onto the lined sheets instead of messing about with an icing bag. 

Leave to stand for 15 mins and then bake in the pre-heated oven for about 12-15 mins. Using a palate knife, remove to a wire rack to cool and then sandwich with the pistachio buttercream. 

Chocolate Macaroons


Tuesday, 9 July 2013

Three Berry Cake

Three Berry Cake

I love cake with fruit in; by that, I don't mean 'fruit cake', although I love that too, or cakes layered or topped with fruit, I mean cake with bits of fresh fruit in the batter. Apple cake is a particular favourite of mine (see here and here for two recipes) but it's obviously an autumnal cake whereas I wanted something in a similar vein but that would celebrate this beautiful weather we're currently enjoying. With the plethora of gorgeous soft fruit we have available in summer, it took much deliberation before deciding on a mixture of raspberries, strawberries and blueberries. Summer in a cake - what more do you want?

I'm linking this up to several blogging challenges. The first is July's gorgeous Tea Time Treats Challenge, Fresh Fruit Treats, jointly run by Karen of Lavender and Lovage (this month's host) and Kate at What Kate Baked.


It's going to Javelin Warrior's wonderful weekly challenge too, Made with Love Mondayswhich encourages everyone to cook from scratch.


JWsMadeWLuvMondays

Finally, I'm entering it into Calender Cakes, run by Rachel from Dolly Bakes and Laura (this month's host) from Laura Loves Cakes. The theme is Fruity Bakes.  

Calendar Cakes Challenge

RECIPE

200g butter
200g caster sugar
200g self raising flour + one tablespoon for the fruit
180g raspberries, strawberries and blueberries (roughly 60g of each fruit)
3 eggs
zest of one lemon

Pre-heat the oven to 180°C

Grease and base line a round cake tin, 22cm diameter

Wash and prepare the fruit.

Cream the butter and sugar together. Add the eggs one at a time, whisking well after each addition. Sieve the flour and fold in. Toss the fruit in a tablespoon of flour (this prevents it from all sinking to the bottom during baking) and fold in to the cake batter along with the grated lemon zest.

Spoon the mixture into the prepared tin, smoothing the top.

Put in the oven and bake for about 45-50 mins or until the cake is cooked and golden brown on top. It takes longer to cook than a normal sponge cake because of the addition of the moist fruit. 

Remove from the oven and leave to cool in the tin for about 20 mins before carefully turning out and leaving to cool on a wire rack. 

This cake makes a perfect pudding eaten still warm from the oven, served with crème anglaise. As a cake, it's wonderful too and in fact tastes even better after a day or two - very handy for a summer picnic.


Tri Berry Cake

Tuesday, 2 July 2013

Tuna with a warm herb vinaigrette


I never seem to learn. Once again, I have succumbed to the temptation to order tuna in a restaurant, drawn in by the enticing descriptions - pan-seared, lemon-scented, herb-encrusted...I've tried them all and they are invariably disappointing. There's nothing wrong with the sauces and salsas, the problem lies with the tuna - it's always overcooked, giving it the consistency of particularly dry cardboard and turning even the finest grade tuna into something that looks and tastes as if it has just come out of a tin. I mean, I'm not disparaging tinned tuna, it certainly has its place, but it definitely cannot be compared to the fresh stuff. After every delusion I vow never to repeat my mistake, only to fall off the wagon again.

The latest let-down left me longing for a decent piece of tuna, seared on the outside for seconds rather than minutes and still juicy and pink within. I liked the idea that I'd seen at the restaurant which was tuna served with a salsa verde. However, I wanted something slightly less aggressive, just some fragrant herbs, a few capers, a squeeze of lemon juice with some of the zest thrown in for good measure, with just enough olive oil to combine everything.

This post is making its way over to the newly named Cooking with Herbs (but it's still our old favourite Herbs on Saturday). The challenge is created and hosted by Karen from the wonderful Lavender and Lovage.

Herbs on Saturday for June: Cooking with Herbs Challenge - Win a Pot of Culinary Lavender Grains

I'm also sending it to Javelin Warrior's wonderful weekly challenge which encourages everyone to cook from scratch, Made with Love Mondays.

JWsMadeWLuvMondays


RECIPE

2 tuna steaks
extra virgin olive oil

For the herb vinaigrette
150ml extra virgin olive oil
handful fresh flatleaf parsley
handful fresh basil
1-2 tbsp capers
juice and zest of half a lemon

For the warm vinaigrette, start by roughly chopping the herbs. Put the olive oil into a small saucepan, adding the herbs, capers and lemon zest (though not the lemon juice at this point). Warm everything very gently over a low heat. 

In the meantime, heat a heavy-based griddle pan until hot. Season the tuna steaks with some sea salt and rub with the olive oil. When the pan is very hot, put the tuna steaks in and sear for just one minute each side. It should still be pink inside. 

Just before serving, stir the lemon juice into the sauce, season to taste with salt and pepper and spoon over the tuna. 

In the photo you can see that I served this with some courgettes which I lightly sauteed in olive oil, adding a squeeze of lemon juice at the end. 


Thursday, 13 June 2013

Torta della Nonna - Tuscan Custard Tart


Torta della Nonna

'Grandmother's Cake' is a classic, Tuscan/Ligurian dessert although there are as many different variations of it as there are grandmothers. As it's Father's Day in the UK this Sunday, if we disregard the Italian appellation, this would make a perfect ending for any Father's Day meal.

The tart combines a delicate, thin pastry crust with a thick, wobbly, vanilla-scented pastry cream inside. Pine nuts are sprinkled over the top to give a welcome crunch. My take on it is fairly traditional (bearing in mind of course that I am neither Tuscan nor a nonna) but I add almonds to the pine nuts on top, having tasted one like that in Siena recently. 

As this is completely made from scratch I'm sending it to Javelin Warrior's wonderful weekly challenge, Made with Love Mondays.

JWsMadeWLuvMondays


RECIPE

For the pastry
200g 00 flour
100g cold unsalted butter
75g caster sugar
1 egg
grated zest of half a lemon
1 teaspoon vanilla paste or extract
a pinch of salt

For the custard
350ml milk
grated zest of half a lemon
2 eggs
100g caster sugar
1 teaspoon vanilla paste or extract
25g plain flour

For the topping
25g pine nuts and/or roughly chopped almonds


For the pastry, chop the butter and put it in the freezer for about 5-10 minutes. Take it out and put it into a food processor together with all the other pastry ingredients. With the blade attachment, pulse until it just starts coming together then dump out onto a board and bring the mixture together with your hands until just combined. Wrap in cling film and chill for 30 mins. 

For the filling, heat the milk and lemon zest until nearly boiling. While that's happening, put all the other ingredients in a heat proof bowl and whisk together to combine (I use an electric hand whisk or mixer). Whisking continuously, add the hot milk gradually then scrape the entire mixture back into the saucepan. Return to the heat and bring to the boil, whisking constantly until the mixture has thickened. Remove from the heat and allow to cool completely (not in the fridge though as it tends to make the custard lumpy).

 Pre-heat the oven to 180°C. Lightly flour a work surface and roll out two thirds of the pastry and use it to line a 21cm round, loose-bottomed tin. Whisk the filling again, making sure it's smooth and spoon into the pastry case, levelling it out with the back of the spoon  Fold over the excess pastry onto the top of the custard. Roll out the remaining pastry and cut into a round to cover the filling. Lay on top of the custard, pressing lightly onto the folded-over pastry to seal. Sprinkle over the pine nuts and almonds if using.

Bake for 50 mins until golden. Leave to cool for 10 mins in the tin, then carefully remove the outer ring and leave to cool completely on a wire rack.

Dust liberally with icing sugar before serving. 

Tuscan Custard Tart

Friday, 7 June 2013

Gnudi - Tuscan Spinach and Ricotta Dumplings

Gnudi

Although they may resemble gnocchi, these little dumplings are in fact quite different as they don't contain potatoes. This makes them light and delicious. Originally from Tuscany, they are basically the filling of classic ravioli but without the outer pasta layer hence the name Gnudi which in Tuscan dialect means 'nude'. You don't often find them in restaurants as they don't keep well once they're made but they're easy enough to prepare at home and well worth it. They just need delicate handling - they're so light they're practically little clouds.

The classic version contains only spinach but I like to add fresh parsley to the mixture as well, to give the flavour a bit of a lift. You could add other herbs too - I like the idea of fresh mint or maybe basil.

This post is making its way over to one of my favourite challenges, Herbs on Saturday, soon to become Cooking with Herbs and sporting a lovely new badge to boot! The challenge is created and hosted by Karen from the wonderful Lavender and Lovage.

Herbs on Saturday for June: Cooking with Herbs Challenge - Win a Pot of Culinary Lavender Grains

I'm also sending it to Javelin Warrior's wonderful weekly challenge which encourages everyone to cook from scratch, Made with Love Mondays.


JWsMadeWLuvMondays

RECIPE - serves 4

450 g fresh spinach
50g fresh parsley, roughly chopped
500 g ricotta cheese
2 eggs, beaten
70 g flour
100 g Parmesan cheese, freshly grated
salt
nutmeg
pepper

6 sage leaves
50 g butter

Drain the ricotta of excess liquid by leaving in a colander for a few hours or overnight in the fridge. 

Wash the spinach, drain briefly and put in a saucepan just as it is to wilt, turning it over from time to time so that the leaves on top cook as well as the leaves on the bottom. Allow to cool slightly then chop roughly. 

Meanwhile, mix the ricotta cheese with the flour, eggs and parmesan, stir well and add a pinch of nutmeg,  and season well with salt and pepper. Stir and add the chopped spinach and fresh parsley. Mix everything together thoroughly. 

Bring a large pot of salted water to the boil. 

Shape the mixture into oval dumplings, slightly smaller than golf balls. Place gently into the boiling salted water. They are ready when they float to the surface, it usually only takes a few minutes. 

While the gnudi are cooking, melt the butter with the sage leaves. 

Remove the gnudi from the water with a slotted spoon, place in a serving dish and pour over the melted butter. Serve with more freshly grated Parmesan. 


Ricotta and Spinach Dumplings

Monday, 15 April 2013

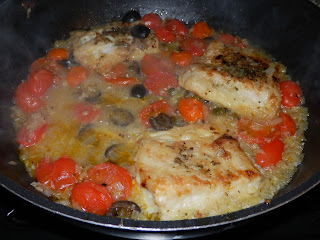
Cod with Tomatoes, Olives and Capers - Merluzzo alla Livornese

Cod with tomatoes, olives and capers

While I think that traditional fish and chips has its place, I certainly don't think that deep-frying cod in this way shows off the firm, flaky texture to its best advantage. In this recipe for Livorno-style cod, the fish is simmered gently in white wine with fresh tomatoes, black olives and capers. The addition of garlic and oregano gives added depth of flavour. Like so many fish dishes, this is simple to prepare, healthy and full of flavour. The end result is a real taste of the Mediterranean with beautifully cooked cod, firm yet moist, and a wonderful, rich sauce from the wine, olive oil and herbs that develops while cooking. I tend to serve this with just a simple green salad and some crusty bread to mop up the delicious juices. 

This post is making its way over to one of my favourite challenges, Herbs on Saturday, created by Karen from the wonderful Lavender and Lovage.

Herbs on Saturday

I'm also sending it to Javelin Warrior's wonderful weekly challenge which encourages everyone to cook from scratch, Made with Love Mondays.
JWsMadeWLuvMondays


RECIPE - serves 2 

400-500g cod loin or fillet, as thick as possible
plain flour
2 teaspoons dried oregano 
1 clove garlic, crushed
1 onion
8 black olives, halved
1 tablespoon capers
250g cherry tomatoes, halved
2 tablespoons olive oil
250 ml dry white wine
1 teaspoon fresh oregano, roughly chopped

Finely chop the onion and sweat gently in a large frying pan (one with a lid) for about 7 minutes in a tablespoon of the olive oil until translucent but not coloured. 

While the onion is cooking, you can prepare the fish. Cut the cod so that you have about 4 smaller fillets. Sprinkle the dried oregano over the cod, pressing it in slightly. Repeat on the other side. Put some flour onto a plate, season with salt and pepper, then flour the cod on both sides, knocking off the excess. 

When the onion is soft, remove from the frying pan with a slotted spoon. Add a little more olive oil to the pan and turn up the heat to medium. Add the cod and brown on both sides until a nice, golden colour. 

Put the softened onion back in the pan with the cod and add the wine, olives, tomatoes and capers. Put the lid on and cook over a low-medium heat for about 20 minutes or until the cod is cooked but still moist.

Add the fresh oregano and season with salt and pepper to taste.

Serve with crusty bread. 

Merluzzo alla Livornese