Tuesday, 30 July 2013

'Caffe Shakerato' - Iced Italian Coffee


Apart from the more obvious benefits of this beautiful summer weather, it's also given me the opportunity to dust off some all-but-forgotten favourites we used to enjoy in Italy. One of these is the 'Caffe Shakerato', pronounced as you would expect. It seems incredible that simply shaking strong sweet espresso with ice can produce such a dense, creamy foam but it does. Just look at the photo - there is no milk or cream there, only espresso, sugar and ice.

Normally, I loathe coffee with sugar in, to my mind it's like drinking hot, liquid coffee cake. My usual espresso is strictly unadulterated - no milk, no sugar and certainly no flavoured syrups. However, I make an exception in this case - you really do need a touch of sweetness when drinking coffee at these icy temperatures.

It goes without saying really that the quality of your caffe shakerato depends on the quality of your espresso.

RECIPE - enough for 2

3 small cups of freshly made espresso
2-4 teaspoons of sugar (depending on taste)
ice

Add the sugar to the espresso while it's still hot so it dissolves completely. 

Half fill a cocktail shaker with ice, pour in the sweetened espresso and shake vigorously for a minute or two until you have a rich, creamy foam. Serve in chilled martini glasses or champagne flutes.

A perfect ending to an al fresco lunch or dinner.


Friday, 26 July 2013

Chocolate and Pistachio Macaroons

Chocolate and Pistachio Macaroons

I do realise that macaroons are no longer at the apex of food fashion. Luckily for me, I am not a slavish follower of trends; I mean, just think of how many things I would have had to deny myself over the years simply because they were no longer 'fashionable' - prawn cocktail, black forest gateau, goat's cheese salad, chicken kiev...

Macaroons may have had their day but I stay true. Their small size and intense sweetness, coupled with the chewy yet soft texture make them an ideal way to finish a meal. They're also perfect with an espresso at any time of the day.

This particular version has been inspired by Nigella - indeed, it is a reworking of her chocolate macaroons sandwiched together with the filling from her pistachio ones. I'm including the recipe for the chocolate macaroons here because I've adapted it and you can find the recipe for the pistachio filling in Nigella's book, How to be a Domestic Goddess.

There are some fellow bloggers who make very impressive macaroons - have a look at Corner Cottage Bakery's stunningly beautiful white-on-white ones here, Blue Kitchen Bakes' delicious sounding raspberry filled ones here and Supergolden Bakes' incredibly professional ones here.

As these are perfect for parties, I'm sending them over to A Kick at the Pantry Door for July's Forever Nigella challenge, started by Sarah at Maison Cupcake.


As they are completely made from scratch, they're going to Javelin Warrior's wonderful weekly challenge too, Made with Love Mondays

125g icing sugar
60g ground almonds
15g cocoa
2 egg whites
15g caster sugar

Pre-heat the oven to 180°C

Line 2 baking sheets with greaseproof paper

Sift the icing sugar, ground almonds and cocoa powder together. Whisk the egg whites until fairly stiff then sprinkle over the caster sugar. Continue whisking until the egg whites become very stiff then gently fold in the sifted ingredients. 

If you have an icing bag (I use the disposable ones), fit with a plain nozzle and fill with the macaroon mixture. It's a little bit fiddly and the mixture is really sticky so try to get it all in the bag! Pipe out small rounds onto the prepared baking sheets. If you're not bothered about having perfect discs, you can just put small teaspoons of the mixture onto the lined sheets instead of messing about with an icing bag. 

Leave to stand for 15 mins and then bake in the pre-heated oven for about 12-15 mins. Using a palate knife, remove to a wire rack to cool and then sandwich with the pistachio buttercream. 

Chocolate Macaroons


Tuesday, 9 July 2013

Three Berry Cake

Three Berry Cake

I love cake with fruit in; by that, I don't mean 'fruit cake', although I love that too, or cakes layered or topped with fruit, I mean cake with bits of fresh fruit in the batter. Apple cake is a particular favourite of mine (see here and here for two recipes) but it's obviously an autumnal cake whereas I wanted something in a similar vein but that would celebrate this beautiful weather we're currently enjoying. With the plethora of gorgeous soft fruit we have available in summer, it took much deliberation before deciding on a mixture of raspberries, strawberries and blueberries. Summer in a cake - what more do you want?

I'm linking this up to several blogging challenges. The first is July's gorgeous Tea Time Treats Challenge, Fresh Fruit Treats, jointly run by Karen of Lavender and Lovage (this month's host) and Kate at What Kate Baked.


It's going to Javelin Warrior's wonderful weekly challenge too, Made with Love Mondayswhich encourages everyone to cook from scratch.


JWsMadeWLuvMondays

Finally, I'm entering it into Calender Cakes, run by Rachel from Dolly Bakes and Laura (this month's host) from Laura Loves Cakes. The theme is Fruity Bakes.  

Calendar Cakes Challenge

RECIPE

200g butter
200g caster sugar
200g self raising flour + one tablespoon for the fruit
180g raspberries, strawberries and blueberries (roughly 60g of each fruit)
3 eggs
zest of one lemon

Pre-heat the oven to 180°C

Grease and base line a round cake tin, 22cm diameter

Wash and prepare the fruit.

Cream the butter and sugar together. Add the eggs one at a time, whisking well after each addition. Sieve the flour and fold in. Toss the fruit in a tablespoon of flour (this prevents it from all sinking to the bottom during baking) and fold in to the cake batter along with the grated lemon zest.

Spoon the mixture into the prepared tin, smoothing the top.

Put in the oven and bake for about 45-50 mins or until the cake is cooked and golden brown on top. It takes longer to cook than a normal sponge cake because of the addition of the moist fruit. 

Remove from the oven and leave to cool in the tin for about 20 mins before carefully turning out and leaving to cool on a wire rack. 

This cake makes a perfect pudding eaten still warm from the oven, served with crème anglaise. As a cake, it's wonderful too and in fact tastes even better after a day or two - very handy for a summer picnic.


Tri Berry Cake

Tuesday, 2 July 2013

Tuna with a warm herb vinaigrette


I never seem to learn. Once again, I have succumbed to the temptation to order tuna in a restaurant, drawn in by the enticing descriptions - pan-seared, lemon-scented, herb-encrusted...I've tried them all and they are invariably disappointing. There's nothing wrong with the sauces and salsas, the problem lies with the tuna - it's always overcooked, giving it the consistency of particularly dry cardboard and turning even the finest grade tuna into something that looks and tastes as if it has just come out of a tin. I mean, I'm not disparaging tinned tuna, it certainly has its place, but it definitely cannot be compared to the fresh stuff. After every delusion I vow never to repeat my mistake, only to fall off the wagon again.

The latest let-down left me longing for a decent piece of tuna, seared on the outside for seconds rather than minutes and still juicy and pink within. I liked the idea that I'd seen at the restaurant which was tuna served with a salsa verde. However, I wanted something slightly less aggressive, just some fragrant herbs, a few capers, a squeeze of lemon juice with some of the zest thrown in for good measure, with just enough olive oil to combine everything.

This post is making its way over to the newly named Cooking with Herbs (but it's still our old favourite Herbs on Saturday). The challenge is created and hosted by Karen from the wonderful Lavender and Lovage.

Herbs on Saturday for June: Cooking with Herbs Challenge - Win a Pot of Culinary Lavender Grains

I'm also sending it to Javelin Warrior's wonderful weekly challenge which encourages everyone to cook from scratch, Made with Love Mondays.

JWsMadeWLuvMondays


RECIPE

2 tuna steaks
extra virgin olive oil

For the herb vinaigrette
150ml extra virgin olive oil
handful fresh flatleaf parsley
handful fresh basil
1-2 tbsp capers
juice and zest of half a lemon

For the warm vinaigrette, start by roughly chopping the herbs. Put the olive oil into a small saucepan, adding the herbs, capers and lemon zest (though not the lemon juice at this point). Warm everything very gently over a low heat. 

In the meantime, heat a heavy-based griddle pan until hot. Season the tuna steaks with some sea salt and rub with the olive oil. When the pan is very hot, put the tuna steaks in and sear for just one minute each side. It should still be pink inside. 

Just before serving, stir the lemon juice into the sauce, season to taste with salt and pepper and spoon over the tuna. 

In the photo you can see that I served this with some courgettes which I lightly sauteed in olive oil, adding a squeeze of lemon juice at the end. 


Tuesday, 18 June 2013

Raspberry Bakewell Tart

Raspberry Bakewell Tart

Strawberries are undoubtedly the most popular fruit of summer. Juicy and luscious, with their shameless scarlet colour and heady fragrance, they are the Marilyn Monroe of the berry world. At their best, they are indeed a delight but their ubiquitous presence in every supermarket, greengrocer and corner shop from April to October can often bring disappointment, with tastes ranging from somewhat bland to downright insipid. Raspberries however rarely betray us. Their texture is consistently good, never watery or slushy, their delicate flavour sweet yes but tempered with a sour note, subtle, more complex on the palate, Grace Kelly perhaps or Katharine Hepburn.

Raspberries are used to great effect in this recipe. A classic Bakewell tart is shortcrust pastry, filled with raspberry jam and an almondy sponge. This version, based loosely on a Nigella recipe in How To Eat, intensifies the flavours by using almonds both in the frangipane filling and the pastry and providing a double hit of fruit by adding some fresh raspberries on top of the jam. The result is wonderful - light, crisp pastry; rich, buttery frangipane; sweet, tangy raspberry. Pudding perfection.

I'm linking this up to four blogging challenges. The first is the One Ingredient Challenge run by Nazima (this month's host) from Franglais Kitchen and Laura from How to Cook Good Food. Their theme for June is Raspberries and as I love them, I'm really looking forward to seeing everyone's ideas.

One Ingredient June Rasberries

The second is Ren Behan's Simple and In Season Challenge, another blog event that encourages us all to use local, fresh, seasonal produce.

Simple and in Season

The third is Calender Cakes, run by Rachel (this month's host) from Dolly Bakes and Laura from Laura Loves Cakes. The theme for June is Pump Up the Jam. 
Calendar Cakes Challenge
Finally, as this month's letter is 'R' in the brilliant Alphabakes challenge by Ros (this month's host) from TheMoreThanOccasionalBaker and Caroline  at Caroline Makes, I'm sending this as my entry. 


RECIPE

for the pastry
120g plain or 00 flour
40g icing sugar
20g ground almonds
85g butter
1 egg yolk

for the filling
150g fresh raspberries
2 tablespoons raspberry jam
3 eggs
125g butter, melted
125g caster sugar
125g ground almonds
a few drops almond extract
40g flaked almonds

For the pastry, chop the butter and put it in the freezer for about 10 minutes. Take it out and put it into a food processor together with all the other pastry ingredients except the egg yolk. With the double blade attachment, whizz until the mixture is the size of small peas. Then add the egg yolk and pulse until it just starts coming together. Dump out onto a board and form the mixture into a ball, flatten it down a little, wrap in cling film and let it rest in the fridge for 30 mins. 

Pre-heat the oven to 200°C. Lightly flour a work surface and roll the pastry out thinly and use it to line a 21cm round, loose-bottomed tin. Put it back in the fridge for at least 10 minutes while you make the filling. 

For the filling, beat the sugar, almond extract and eggs together. Then pour the melted butter in to the mixture, still stirring. Finally, mix in the ground almonds, beating well to eliminate any lumps. 

Remove the pastry case from the fridge and prick the bottom with a fork. Spread a thin layer of jam over the base and then cover evenly with the raspberries. Pour the frangipane over and sprinkle the flaked almonds on top.

Bake for about 40 mins until golden. Leave to cool for 10 mins in the tin, then carefully remove the outer ring and leave to cool further on a wire rack. You can serve the tart while still warm although it's good cold too.

Classic Bakewell Tart

Thursday, 13 June 2013

Torta della Nonna - Tuscan Custard Tart


Torta della Nonna

'Grandmother's Cake' is a classic, Tuscan/Ligurian dessert although there are as many different variations of it as there are grandmothers. As it's Father's Day in the UK this Sunday, if we disregard the Italian appellation, this would make a perfect ending for any Father's Day meal.

The tart combines a delicate, thin pastry crust with a thick, wobbly, vanilla-scented pastry cream inside. Pine nuts are sprinkled over the top to give a welcome crunch. My take on it is fairly traditional (bearing in mind of course that I am neither Tuscan nor a nonna) but I add almonds to the pine nuts on top, having tasted one like that in Siena recently. 

As this is completely made from scratch I'm sending it to Javelin Warrior's wonderful weekly challenge, Made with Love Mondays.

JWsMadeWLuvMondays


RECIPE

For the pastry
200g 00 flour
100g cold unsalted butter
75g caster sugar
1 egg
grated zest of half a lemon
1 teaspoon vanilla paste or extract
a pinch of salt

For the custard
350ml milk
grated zest of half a lemon
2 eggs
100g caster sugar
1 teaspoon vanilla paste or extract
25g plain flour

For the topping
25g pine nuts and/or roughly chopped almonds


For the pastry, chop the butter and put it in the freezer for about 5-10 minutes. Take it out and put it into a food processor together with all the other pastry ingredients. With the blade attachment, pulse until it just starts coming together then dump out onto a board and bring the mixture together with your hands until just combined. Wrap in cling film and chill for 30 mins. 

For the filling, heat the milk and lemon zest until nearly boiling. While that's happening, put all the other ingredients in a heat proof bowl and whisk together to combine (I use an electric hand whisk or mixer). Whisking continuously, add the hot milk gradually then scrape the entire mixture back into the saucepan. Return to the heat and bring to the boil, whisking constantly until the mixture has thickened. Remove from the heat and allow to cool completely (not in the fridge though as it tends to make the custard lumpy).

 Pre-heat the oven to 180°C. Lightly flour a work surface and roll out two thirds of the pastry and use it to line a 21cm round, loose-bottomed tin. Whisk the filling again, making sure it's smooth and spoon into the pastry case, levelling it out with the back of the spoon  Fold over the excess pastry onto the top of the custard. Roll out the remaining pastry and cut into a round to cover the filling. Lay on top of the custard, pressing lightly onto the folded-over pastry to seal. Sprinkle over the pine nuts and almonds if using.

Bake for 50 mins until golden. Leave to cool for 10 mins in the tin, then carefully remove the outer ring and leave to cool completely on a wire rack.

Dust liberally with icing sugar before serving. 

Tuscan Custard Tart

Friday, 7 June 2013

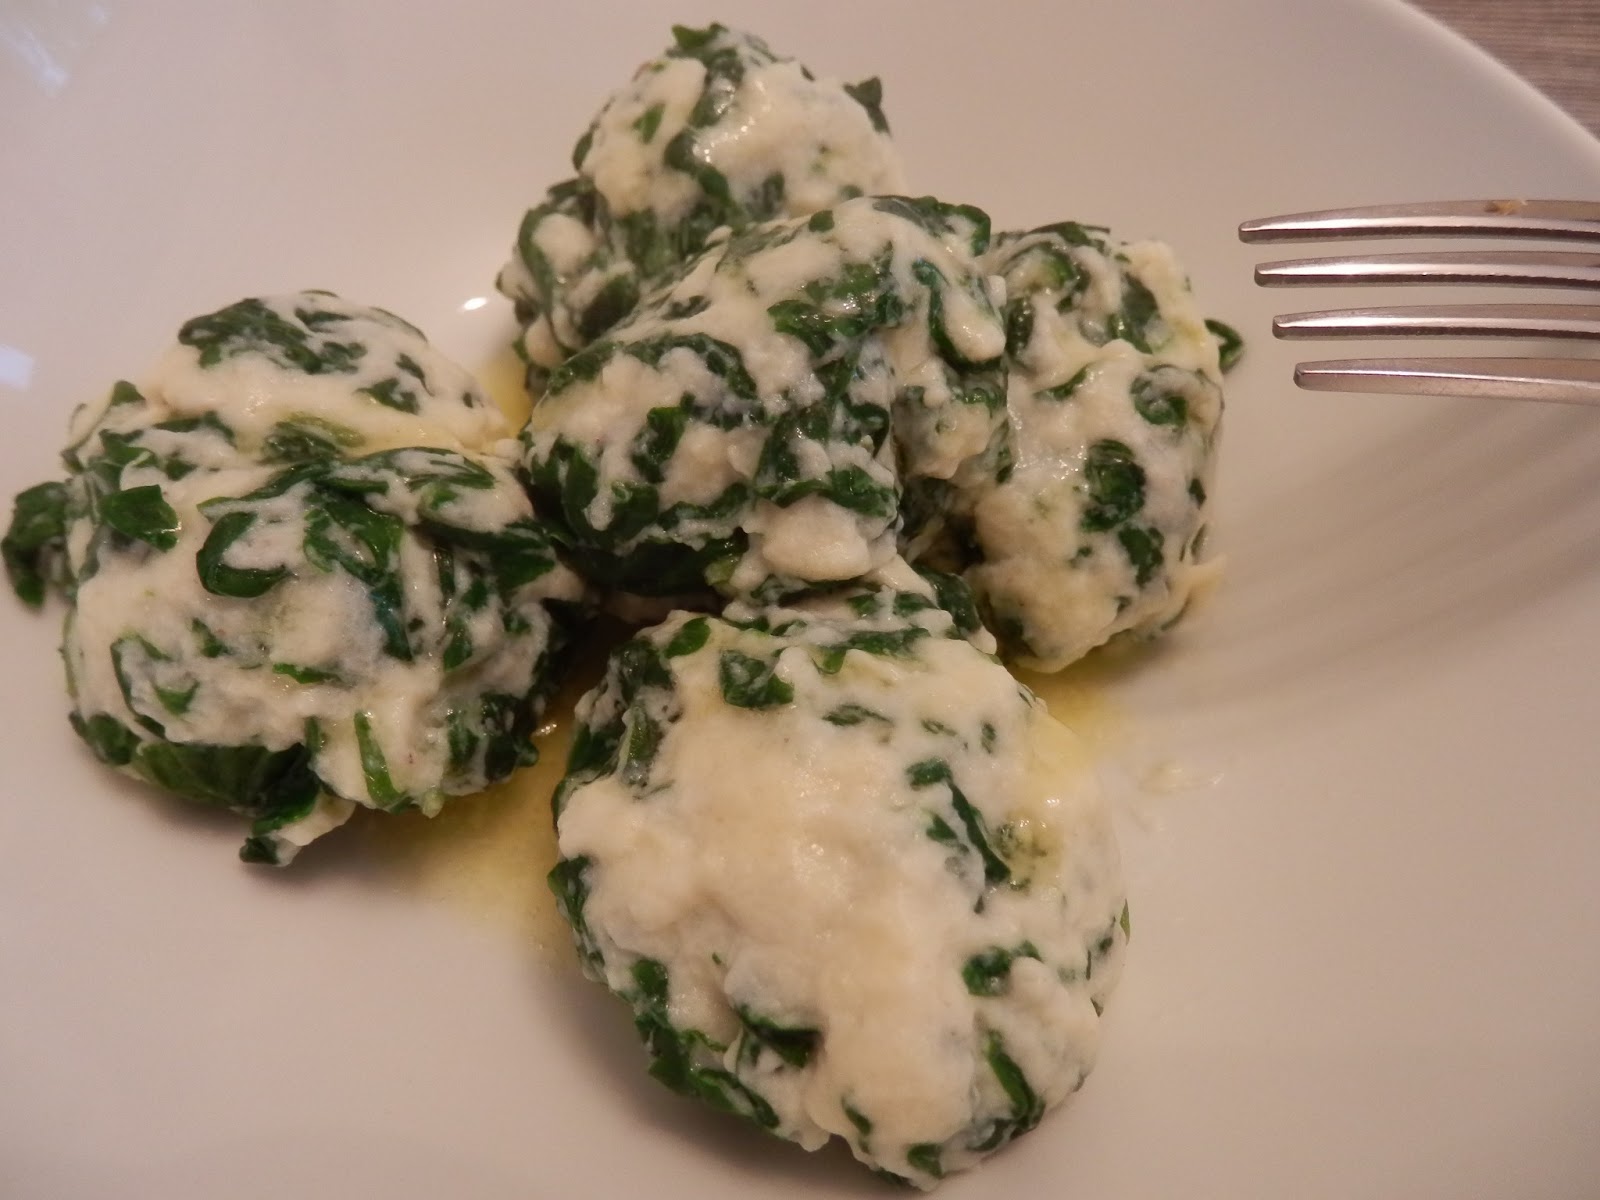
Gnudi - Tuscan Spinach and Ricotta Dumplings

Gnudi

Although they may resemble gnocchi, these little dumplings are in fact quite different as they don't contain potatoes. This makes them light and delicious. Originally from Tuscany, they are basically the filling of classic ravioli but without the outer pasta layer hence the name Gnudi which in Tuscan dialect means 'nude'. You don't often find them in restaurants as they don't keep well once they're made but they're easy enough to prepare at home and well worth it. They just need delicate handling - they're so light they're practically little clouds.

The classic version contains only spinach but I like to add fresh parsley to the mixture as well, to give the flavour a bit of a lift. You could add other herbs too - I like the idea of fresh mint or maybe basil.

This post is making its way over to one of my favourite challenges, Herbs on Saturday, soon to become Cooking with Herbs and sporting a lovely new badge to boot! The challenge is created and hosted by Karen from the wonderful Lavender and Lovage.

Herbs on Saturday for June: Cooking with Herbs Challenge - Win a Pot of Culinary Lavender Grains

I'm also sending it to Javelin Warrior's wonderful weekly challenge which encourages everyone to cook from scratch, Made with Love Mondays.


JWsMadeWLuvMondays

RECIPE - serves 4

450 g fresh spinach
50g fresh parsley, roughly chopped
500 g ricotta cheese
2 eggs, beaten
70 g flour
100 g Parmesan cheese, freshly grated
salt
nutmeg
pepper

6 sage leaves
50 g butter

Drain the ricotta of excess liquid by leaving in a colander for a few hours or overnight in the fridge. 

Wash the spinach, drain briefly and put in a saucepan just as it is to wilt, turning it over from time to time so that the leaves on top cook as well as the leaves on the bottom. Allow to cool slightly then chop roughly. 

Meanwhile, mix the ricotta cheese with the flour, eggs and parmesan, stir well and add a pinch of nutmeg,  and season well with salt and pepper. Stir and add the chopped spinach and fresh parsley. Mix everything together thoroughly. 

Bring a large pot of salted water to the boil. 

Shape the mixture into oval dumplings, slightly smaller than golf balls. Place gently into the boiling salted water. They are ready when they float to the surface, it usually only takes a few minutes. 

While the gnudi are cooking, melt the butter with the sage leaves. 

Remove the gnudi from the water with a slotted spoon, place in a serving dish and pour over the melted butter. Serve with more freshly grated Parmesan. 


Ricotta and Spinach Dumplings