Wednesday 26 September 2012

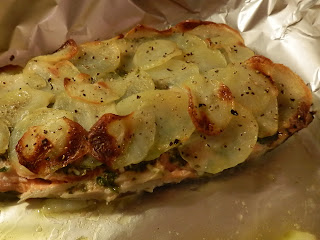
Herby trout with potatoes


Before I write about this dish, I feel I have to come clean about its origins. GL devised the recipe and indeed cooked it for the photo above so I cannot claim any credit for it. However, I have a feeling it will become a staple as it worked so beautifully on every level. The fish, protected by the herbs and potatoes stays wonderfully moist, the herby layer gives the fish a fresh lift and the potatoes provide a crunchy texture to contrast with the softness underneath.

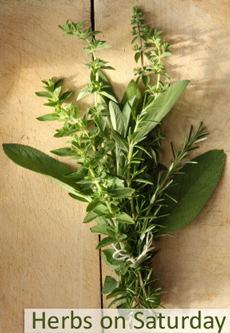
This post is making its way over to one of my favourite challenges, Herbs on Saturday, created and hosted by Karen from the wonderful Lavender and Lovage http://www.lavenderandlovage.com/2012/09/herbs-on-saturday-september-challenge-win-a-copy-of-herbs-river-cottage-handbook.html.

Herbs on Saturday    

RECIPE - serves 2

2 trout fillets
a large handful of fresh parsley
1 clove garlic
2 teaspoons capers
4 medium sized, waxy potatoes
extra-virgin olive oil

Pre-heat the oven to 180 °C .

Peel the potatoes and parboil for about 10 minutes. Allow to cool slightly (so you don't burn your
hands) before slicing thinly.

While the potatoes are cooking, make the herb mixture. You do this by whizzing the parsley, garlic and capers in a blender with about a tablespoon of olive oil until smooth. Season with a generous quantity of freshly-ground black pepper and add salt to taste.

Drizzle some oil in a roasting dish so that the fish doesn't stick - GL lined it with foil as well. Place the fillets on top, spread with the herb mixture and top with the thinly sliced potatoes. Drizzle liberally with olive oil and place in the oven for about 25 minutes. When done, the fish should be cooked but still moist and the potatoes should be crisp and golden brown.


Monday 24 September 2012

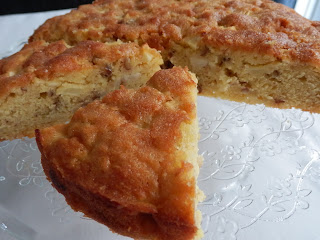
Apple and Walnut Cake

Apple and Walnut cake

I first came across this kind of apple cake in Italy - I spotted it in a bakery, sitting proudly and invitingly on a wooden board under the glass counter, plump with the promise of fragrant, moist apple. Not being able to resist, I bought a generous slice and devoured it as soon as I reached home. It did not disappoint, the apple ensured that it was not dry like many other types of cake in Italy and the addition of cinnamon gave a spicy contrast to the sweetness.
I have since made it many times at home, varying it slightly as the mood takes me. For some reason I like to include walnuts if I make it as one, large round cake but I prefer to leave them out when making individual cupcakes (see here for that recipe).
Although the poor summer has had an adverse effect on a lot of fruit and vegetables this year, my apple harvest is fantastic, the trees groaning with fruit. I used one cooking apple and two red apples for this but you can use whatever you happen to have to hand.

I'm sending this to Katie Bryson from the lovely blog Feeding boys and a firefighter, who is this month's host of the Simple and In Season challenge, the brainchild of Ren at Fabulicious Food.


I'm also sending it to Javelin Warrior's wonderful weekly challenge, Made with Love Mondays.
JWsMadeWLuvMondays


RECIPE

150g butter
180g caster sugar
180g self raising flour
1-2 teaspoons cinnamon (depending on taste)
3 eggs
3 apples
40g walnuts

Pre-heat the oven to 180°C

Grease and base line a round cake tin, 22cm diameter

Peel and core the apples. Chop into small dice. Roughly chop the walnuts.

Cream the butter and sugar together. Add the eggs one at a time, whisking well after each addition. Sieve the flour and cinnamon and fold in, then add the apples and walnuts, stirring well to combine.

Spoon the mixture into the prepared tin, smoothing the top.


If you want a slightly crunchy top, you can sprinkle over a spoon of demerara sugar just before it goes into the oven.

Put in the oven and bake for about 30-35 mins or until the cake is cooked and golden brown on top. It takes slightly longer to cook than a normal sponge cake because of the addition of moist apple.

Remove from the oven. Take the cake out of the tin as soon as possible (without burning yourself of course) and leave to cool on a wire rack.


It is absolutely heavenly eaten still slightly warm from the oven but it also keeps very well because the apple helps the cake stay deliciously moist.

Apple Cake


Monday 17 September 2012

Risotto ai funghi


To my mind, mushroom risotto heralds the start of autumn and although there are a still a few days to go until summer officially ends, the crisp, bright mornings, the dark evenings and the golden leaves falling from my silver birch tree have instilled in me a 'mists and mellow fruitfulness' kind of mood. It was either risotto-making or putting away my summer clothes and I don't feel quite ready to take that step yet.

Risotto ai funghi is an Italian classic. The best versions are made with the king of mushrooms, fresh porcini, which are coming into season right now. They have an incredibly rich, aromatic, almost meaty flavour that is vigorous enough to withstand a fair amount of cooking. However, while I would love to be able to say that this risotto was made with porcini that I picked on a walk in the woods yesterday, it would not be true. I have never yet found any in this area but I am convinced that they do grow here as conditions are surely perfect. There is no need to despair however as a delicious risotto can be made with a combination of dried porcini (which you can fortunately buy everywhere) and some fresh chestnut mushrooms added towards the end of the cooking time.

I always have a packet of dried porcini in the larder as their intense mushroomy flavour not only makes a fantastic risotto but also adds instant 'umami' to a whole variety of sauces and stews. The other ingredient that turns this risotto into something special is a porcini stock cube. I hardly ever use stock cubes but I make an exception for these (dadi Star ai Funghi Porcini) as they add a real punchy flavour. I usually stock up when I'm in Italy because they are not easy to find in the UK but happily, Carluccio's has recently started selling them.

I'm sending this to Katie Bryson from the lovely blog Feeding boys and a firefighter, who is this month's host of the Simple and In Season challenge, the brainchild of Ren at Fabulicious Food.


RECIPE
Serves 2 generously

1 shallot (or half an onion), finely chopped
1 clove garlic, finely chopped
30g dried porcini mushrooms
50g butter
1 teaspoon olive oil
1 glass dry white wine
1 litre mushroom stock (made with porcini stock cube, see above)
250g carnaroli or arborio rice
200-250g chestnut mushrooms
generous grating of fresh parmesan
Put the dried mushrooms to soften in a jug of warm water for about half an hour.

Take the mushrooms out of the water (but make sure you don't throw it away as you will need it later on) and rinse them well, making sure there are no tiny particles of grit or soil left lurking in any crevasses. Chop them roughly but don't make them too small. Filter the mushroom water by pouring it through a sieve lined with a sheet of kitchen towel. You can add this to the stock.


Heat a tablespoon of olive oil and the knob of butter in a pan and add the finely chopped shallot and garlic. Cook over a gentle heat until soft, making sure they do not start to burn. Add the dried porcini mushrooms and carry on cooking for a few minutes.
Tip in the rice and stir well so that all the grains are coated in the buttery juices. Turn up the heat to medium and pour in the wine. Keep stirring until it is absorbed.

Start adding the stock, a ladleful at a time, making sure it is all absorbed before adding the next, stirring all the while to make sure the rice doesn't start to stick.
In the meantime, roughly chop the chestnut mushrooms and fry in a separate pan with a little oil until golden brown.

The rice should be cooked after about 18-20 minutes (it should still have a slight 'bite' to it). You might not need all the stock or you may need a little more (you could just add boiling water). Stir in the cooked chestnut mushrooms at this point.

Add a generous knob of butter, stirring all the time so that it melts into the risotto and the texture becomes creamy. You can also beat in the parmesan at this point or you can sprinkle it over just before eating if you prefer.
Tuesday 11 September 2012

Bakewell Slice


After a week back at work, my gloriously long holiday in France spent wandering around sun-filled medieval villages, eating exquisite pastries and sampling lots of local specialities is rapidly becoming but a distant memory. I need something that will serve the dual purpose of prolonging my French holiday feeling and providing a little treat that will enliven my lunch box and therefore, my working day. If you're feeling generous, colleagues will no doubt appreciate having a plate of homemade sweet treats too.

This recipe from Nigella (taken from her fantastic book 'Feast') for Bakewell Slices fits the bill perfectly. It may seem odd that such an English tart evokes memories of France for me but frangipane is so ubiquitous in French pastries that, in my mind, it is inextricably linked to that country. (Interestingly, Alan Davidson's fantastic tome 'The Oxford Companion to Food', tells us that although frangipane originated in France, first appearing in a French cookery book of 1674, the name actually comes from an Italian aristocrat, Don Cesare Frangipani.)

Be that as it may, I love anything with that sticky, sweet, almondy filling. A real Bakewell Tart is a thing of joy but it takes more effort to make and is best served as pudding. This recipe, as Nigella states, is an easy option as there is no pastry involved but it still delivers the gorgeous combination of buttery almond and jam. The base is Nigella's very rich shortbread but I've slightly adapted the filling, by using three whole eggs plus one yolk and I add a few drops of French almond extract to really intensify the flavour.

As these are perfect for a packed lunch (albeit a slightly decadent one), I'm entering this into the fabulous Forever Nigella challenge started by Sarah at http://blog.maisoncupcake.com/forever-nigella and hosted this month by Nazima http://www.workinglondonmummy.com/2012/09/forever-nigella-september-packed-lunch.html - thank you both for a lovely challenge.


RECIPE (apapted from Nigella's recipe in 'Feast')

For the base
225g plain flour
60g icing sugar
225g butter (I prefer to use salted butter for this but you can use unsalted if you prefer, adding a pinch of salt to the mix)

For the filling
150g butter
3 eggs
1 egg yolk
150g caster sugar
150g ground almonds
60g flaked almonds
325g jam
a few drops of almond extract

A baking tray, about 23x30x6cm, greased and base lined with baking parchment.

Pre-heat the oven to 180 °C .


Whiz the flour and icing sugar in a food processor, add the butter and process again until you have a crumbly mixture just coming together. Press into the tin, forming a thin layer on the bottom. Cook in the oven for 20 mins.

For the filling, melt the butter and allow to cool slightly. Put the eggs, the yolk, sugar and ground almonds in a processor and whiz together.

Take the base out of the oven, allow to cool for a few minutes before spreading with the jam. Add the melted butter and the almond extract to the other ingredients in the processor, keeping the motor running as you do so.

Pour the mixture over the jammy shortbread, top with the flaked almonds (you can toast these beforehand in a pan if you so wish) and bake for 35 minutes.

Allow to cool before cutting into slices.