Showing posts with label Italian classics. Show all posts

Wednesday, 1 April 2015

La Pastiera Napoletana - Neapolitan Easter Tart


Pastiera is a traditional tart from Naples, with a crisp pastry case and a rich, creamy, sweet filling made from ricotta, cooked wheat, eggs, spices and candied peel. Its origins go back along way; in pagan Naples, this tart was made to celebrate the coming of Spring but now firmly belongs to the Easter festivities. The name comes from the word 'pasta' which is what was originally used in the filling instead of the cooked wheat.

The wheat now comes in a tin, ready cooked and prepared just for making this wonderful tart. If you live near an Italian deli, you should be able to buy it easily. If not, you can find it online, called 'Grano Cotto' and it usually says 'per pastiera'.

This isn't something you can make and bake in a hurry; there's a long list of ingredients and it's quite time-consuming to prepare. However, it's not difficult and your reward is a wonderful, rich tart that feels suitably celebratory. It easily serves 8-10 people, perfect for dessert on Easter day.

Love Cake logoAs the theme is Step into Spring, I'm sending this to the Love Cake challenge, run by JibberJabberUK.


RECIPE
  • For the pastry
250g plain flour
125g butter
80g icing sugar
1 egg
1 egg yolk
1 teaspoon vanilla essence
  • For the filling
350g ricotta
300g caster sugar
2 eggs
2 egg yolks
100g candied peel
1 tesapoon cinnamon
zest of 1 lemon
30g butter
200ml milk
250g cooked wheat 
1 vanilla pod
25ml orange flower water

For the pastry, chop the butter and put it in the freezer for about 10 minutes. Take it out and put it into a food processor together with all the other pastry ingredients except the egg and egg yolk. With the double blade attachment, whizz until the mixture is the size of small peas. Then add the egg and egg yolk and pulse until it just starts coming together. Dump out onto a board and form the mixture into a ball, flatten it down a little, wrap in cling film and let it rest in the fridge for 30 mins. 

While the pastry is chilling, you can make a start on the filling. In a saucepan, heat the milk, cooked wheat, lemon zest and butter together until it starts to simmer. Keep it simmering gently until it is thick and creamy. Remove from the heat and leave the mixture to cool.

Pre-heat the oven to 200°C. Lightly flour a work surface and roll the pastry out thinly and use it to line a 25cm round, loose-bottomed tin, leaving some to create a lattice effect on the top of the tart. Put it back in the fridge for at least 10 minutes while you continue with the filling. 

In a food processor, whizz together the eggs, ricotta, sugar, cinnamon, vanilla seeds (scraped out of the pod) and orange flower water until you have a smooth liquid without any lumps.

Add the two mixtures together and finally fold in the candied peel. Pour the mixture carefully into the prepared pastry case and cover the top with a pastry lattice. The filling should come almost up to the top. Brush the lattice lightly with egg wash.

Bake in the oven at 200°C for 60 minutes until the tart is puffed and golden. 

Leave to cool in the tin.

Keep in a cake tin in a cool place for about two days before eating.


Monday, 3 March 2014

Tortelli di Carnevale - Carnival Doughnuts

Tortelli di Carnevale

Preparations for lent in Italy last much longer than the one day we have here in the UK when we eat pancakes. Italian festivities include parades and parties as well as sweet treats. The most popular Italian destination for Carnival is undoubtedly Venice for the lavish costumes and masks worn at this time. Yet almost all towns and cities in Italy have their own carnevale, with parades and floats, masks and fancy dress. Most of these take place during the weekend before Shrove Tuesday although in Milan and surrounding areas, the celebrations carry on up until the following Saturday. 

Like many other countries, the local specialities at this time of year are based around eggs/milk/butter/sugar. Exact recipes differ from town to town, and take various forms and names although the unifying characteristic is that they are fried. The little doughnuts here are from the Milan area and are surprisingly light, with a fluffy centre. If you want to be really indulgent, you can fill them with crème pâtissière which is how I used to buy them from my favourite pasticceria.

As these are made completely from scratch, I'm sending this over to Javelin Warrior's wonderful weekly challenge, Made with Love Mondays.

JWsMadeWLuvMondays

RECIPE

50g butter
50g caster sugar
125ml milk
1 teaspoon vanilla extract
grated zest of 1 lemon
150g self raising flour
4 eggs + 1 egg yolk

sunflower oil for frying
caster sugar for dredging


Put the butter, caster sugar, milk, vanilla and lemon zest in a saucepan and bring to the boil over a medium heat, stirring with a wooden spoon.

When it has reached boiling point, remove from the heat and add the sifted flour. Mix well until it forms a ball. Put this back on the heat for a minute or two, until you see a thin white coating on the bottom of the pan.

Remove from the heat and transfer the mixture to a bowl. Leave to cool for about 20 minutes.

When it has cooled, start adding the eggs and extra yolk. Mix them in one at a time, beating vigorously - make sure that each egg is thoroughly absorbed before adding the next. The batter should not be too thin at the end.


When you're ready to make the fritters, fill a high-sided pan about half full of oil and heat until a drop of batter sizzles when dropped in - it should be about 170º-180ºC, hot but not boiling.

Fry rounded teaspoons of batter, making sure you don't overcrowd the pan, about 5 at a time is ideal. Quickly flip them over when they are golden brown and leave them to cook for a minute on the other side.


Take them out carefully with a slotted spoon and place on some kitchen towel to absorb some of the grease. Serve straightaway, with caster sugar sprinkled liberally over. 


Carnival Doughnuts

Saturday, 10 August 2013

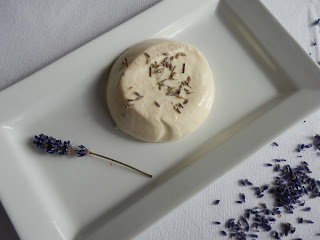
Lavender Scented Panna Cotta

Panna Cotta

I loathe the sort of panna cotta that you get in most restaurants, that over-sweetened, very firm, almost rubbery white sphere. For me, it should be soft and very wobbly, with only just enough gelatine to hold it together. I find the all-cream versions too heavy; the perfect ratio for me is half milk (full-fat of course) and half double cream. However, if you prefer a creamier version, just up the cream to 300 ml and reduce the milk to 200 ml. See the recipe for a note about the sugar too.

Lavender adds a delicate, flowery note that works well with the rich creaminess of the panna cotta and is ideal for summer. A more traditional one can be made by replacing the lavender with a teaspoon of good vanilla extract. I urge you to try making this. It takes just minutes to prepare and it's perfect for entertaining as it has to be made the day before and left in the fridge to chill. Also, everyone loves it, even those (like myself) who don't usually like panna cotta.

I'm entering this into the Tea Time Treats Challenge, with the theme of Ice-Creams, Jellies and Chilled Desserts, run by Karen of Lavender and Lovage  and Kate (this month's host) from What Kate Baked. 


As it uses lavender, I'm also sending this over to Karen from the wonderful Lavender and Lovage for her extremely popular challenge, Cooking with Herbs (formerly known as Herbs on Saturday).

Herbs on Saturday for June: Cooking with Herbs Challenge - Win a Pot of Culinary Lavender Grains

RECIPE

250ml double cream
250ml full-fat milk
60-70g caster sugar (I use 60g as I don't like it too sweet but you can increase the amount of sugar if you prefer)
4g gelatine leaves
1 teaspoon of dried lavender (usually labelled 'for culinary use')

Put the gelatine sheets in cold water to soak.

Put the milk, cream, lavender and sugar in a saucepan and heat gently, stirring until the sugar is dissolved. When it's just about to boil, remove from the heat and leave for a few minutes for the lavender to infuse. Stir in the squeezed-out gelatine, then strain the mixture through a sieve to remove the lavender.

Pour into small moulds and leave to set in the fridge overnight. 

To serve, run a knife around the panna cotta before inverting onto a plate. Sprinkle some dried lavender over the top if you wish. 


Lavender Scented Panna Cotta

Monday, 17 September 2012

Risotto ai funghi


To my mind, mushroom risotto heralds the start of autumn and although there are a still a few days to go until summer officially ends, the crisp, bright mornings, the dark evenings and the golden leaves falling from my silver birch tree have instilled in me a 'mists and mellow fruitfulness' kind of mood. It was either risotto-making or putting away my summer clothes and I don't feel quite ready to take that step yet.

Risotto ai funghi is an Italian classic. The best versions are made with the king of mushrooms, fresh porcini, which are coming into season right now. They have an incredibly rich, aromatic, almost meaty flavour that is vigorous enough to withstand a fair amount of cooking. However, while I would love to be able to say that this risotto was made with porcini that I picked on a walk in the woods yesterday, it would not be true. I have never yet found any in this area but I am convinced that they do grow here as conditions are surely perfect. There is no need to despair however as a delicious risotto can be made with a combination of dried porcini (which you can fortunately buy everywhere) and some fresh chestnut mushrooms added towards the end of the cooking time.

I always have a packet of dried porcini in the larder as their intense mushroomy flavour not only makes a fantastic risotto but also adds instant 'umami' to a whole variety of sauces and stews. The other ingredient that turns this risotto into something special is a porcini stock cube. I hardly ever use stock cubes but I make an exception for these (dadi Star ai Funghi Porcini) as they add a real punchy flavour. I usually stock up when I'm in Italy because they are not easy to find in the UK but happily, Carluccio's has recently started selling them.

I'm sending this to Katie Bryson from the lovely blog Feeding boys and a firefighter, who is this month's host of the Simple and In Season challenge, the brainchild of Ren at Fabulicious Food.


RECIPE
Serves 2 generously

1 shallot (or half an onion), finely chopped
1 clove garlic, finely chopped
30g dried porcini mushrooms
50g butter
1 teaspoon olive oil
1 glass dry white wine
1 litre mushroom stock (made with porcini stock cube, see above)
250g carnaroli or arborio rice
200-250g chestnut mushrooms
generous grating of fresh parmesan
Put the dried mushrooms to soften in a jug of warm water for about half an hour.

Take the mushrooms out of the water (but make sure you don't throw it away as you will need it later on) and rinse them well, making sure there are no tiny particles of grit or soil left lurking in any crevasses. Chop them roughly but don't make them too small. Filter the mushroom water by pouring it through a sieve lined with a sheet of kitchen towel. You can add this to the stock.


Heat a tablespoon of olive oil and the knob of butter in a pan and add the finely chopped shallot and garlic. Cook over a gentle heat until soft, making sure they do not start to burn. Add the dried porcini mushrooms and carry on cooking for a few minutes.
Tip in the rice and stir well so that all the grains are coated in the buttery juices. Turn up the heat to medium and pour in the wine. Keep stirring until it is absorbed.

Start adding the stock, a ladleful at a time, making sure it is all absorbed before adding the next, stirring all the while to make sure the rice doesn't start to stick.
In the meantime, roughly chop the chestnut mushrooms and fry in a separate pan with a little oil until golden brown.

The rice should be cooked after about 18-20 minutes (it should still have a slight 'bite' to it). You might not need all the stock or you may need a little more (you could just add boiling water). Stir in the cooked chestnut mushrooms at this point.

Add a generous knob of butter, stirring all the time so that it melts into the risotto and the texture becomes creamy. You can also beat in the parmesan at this point or you can sprinkle it over just before eating if you prefer.

Monday, 30 July 2012

Tomato, basil and mozzarella pasta


Red, white and green, the Italian flag (and coincidentally, the colours of Y Ddraig Goch, the Welsh Dragon) on a plate. Yes, it's another dish based on my favourite Italian trinity of mozzarella, tomato and basil (for other recipes featuring these flavours have a look at Insalata Caprese and Baked pasta with mozzarella and tomatoes). I make no apology for this, I happen to think that the combination is simply perfect for the warmer summer weather.

The recipe below is for a standard, hot pasta dish. However, Italians often prepare this as a cold pasta salad in the hot summer months. If you want to try it like that, cook the pasta until just al dente, then drain it and refresh in cold water. Then simply toss the other ingredients with the pasta, without cooking them, omitting the onion and dressing with a generous glug of extra virgin olive oil.

As there's still time (just!), I'm sending this over to Laura (this month's host) at www.howtocookgoodfood.co.uk and Nazima of  Working London Mummy for the July One Ingredient challenge - Tomatoes.


RECIPE - serves 3-4

350g pasta (any 'short' kind, I used fusilli)
7-8 large tomatoes
125g ball mozzarella
half a small onion or 1 shallot
extra virgin olive oil
handful fresh basil

Chop the onion or shallot very finely. In a frying pan, heat enough olive oil to cover the base and add the onion/shallot. Cook gently until very soft, about 10-15 minutes. 

While the onion is sweating, prepare the tomatoes. First, you have to peel them, not a particularly pleasant job but worth doing for this dish. The easiest way is to score a small cross in the skin of the base of the tomatoes. Place in a bowl and pour boiling water over them. Leave for a minute, then place the tomatoes in cold water and peel off the skin. After peeling, roughly chop.

Chop the mozzarella into small dice.

In the meantime, cook the pasta in lots of boiling salted water. When the pasta is almost ready, add the tomatoes to the softened onion and cook for a minute or two. Season with salt and pepper. 
When the pasta is al dente, remove from the heat, drain well and toss with the tomatoes and onions and the fresh basil, roughly torn. Just before serving, scatter the diced mozzarella over the pasta and gently mix it in, drizzling over a little more olive oil.
NB: Don't be tempted to mix the mozzarella in any earlier because it starts to melt as soon as it hits the heat and instead of it being evenly distributed through the pasta, you end up with a mass of melted mozzarella that won't mix in! I speak from experience...

Wednesday, 20 June 2012

Insalata Caprese - tomato and mozzarella salad


Now, I know that you probably don't actually need a recipe for this salad but I include it more as a reminder really. It is an all-time favourite of mine, simple and yet utterly delicious, perfect for lunch at this time of year. It requires almost nothing of you in the way of preparation, ready to eat in less than 3 minutes, but in such a simple dish the quality of the ingredients is paramount. The basil has to be as fresh as possible and the tomatoes must be ripe and full of flavour (don't even think about making this in winter!). Make sure that they haven't just come out of the fridge either, the cold diminishes their flavour. Olive oil is used alone here so make sure it's the best - this is the time to use your single estate, cold pressed, unfiltered extra virgin stuff. Oh, and the mozzarella should be from buffalo milk (although I have to confess that I love this salad so much I even enjoy eating it with the bog-standard rubbery mozzarella from supermarkets).

As you can see from the photo, I don't go in for the classic 'Caprese' presentation as I find the overlapping spiral of perfect slices rather clinical and austere. I just tear the mozzarella, roughly chop the tomatoes and pile it up on a plate - so much more inviting and just begging to be devoured.

RECIPE (for one person)

a ball of mozzarella (buffalo if possible)
a handful of tomatoes (any size or variety as long as they've got flavour!)
fresh basil leaves, about 5 or 6, or to taste
extra virgin olive oil
sea salt

Roughly chop the tomatoes and tear the mozzarella into chunks. Place on a plate, scatter over the basil leaves, drizzle with olive oil and season with salt. (I use black pepper too because I think it really enhances the flavour of tomatoes but you would never see it in Italy).
Serve and eat.

Tuesday, 22 May 2012

Pollo alla Cacciatora


This 'hunter-style' chicken dish originally comes from Tuscany but is popular all over Italy. As with any classic dish, every family has their own way of making it but the variations are usually minimal, an extra ingredient here, a different cooking method there. When I see this dish abroad, it sometimes seems to veer so far from the original that it is almost unrecognisable.

The recipe below is a standard one; if you wish, you can add some pancetta or maybe a few mushrooms to it. Just don't get too carried away.

RECIPE - serves 4

1 chicken, jointed (or 8 pieces)
1 onion
2 carrots
3 sticks celery
1 clove garlic
1 glass red wine
a few sprigs of rosemary
400g tin chopped tomatoes
olive oil
a handful of fresh parsley, chopped

Finely chop the onion, carrots, celery and garlic (or whizz together in a food processor for a few seconds). Heat a little olive oil in a large frying pan (with lid) and add the vegetables. Cook over a low heat until soft, being careful not to let them brown. Remove to a plate.

Add a little more oil to the pan and brown the chicken pieces on all sides, over a high heat. When the pieces are golden brown, return the vegetables to the pan, add the rosemary and pour the wine in.

Let the wine bubble up for a few minutes, then add the tomatoes and some salt and pepper and bring to the boil. Turn the heat down, cover with a lid and simmer over a medium heat for about 30-40 mins, or until the chicken is tender and cooked through. Give everything a gentle stir from time to time so that it doesn't burn on the bottom and add a little water if it seems to be getting too dry.

When the chicken is ready, sprinkle the parsley over and serve with mashed potatoes or soft polenta.


Saturday, 18 February 2012

Perfect Pizza

One of the things we miss most about living in Italy is being able to pop out to the local pizzeria for a decent pizza. Almost every Friday night we would go to Fabbrica Pizza (Pizza Factory) for dinner. If we were really hungry, we would start with a Focaccia di Recco which is quite unlike usual focaccia, being made from two layers of extremely thin dough, with a filling of stracchino, a soft cheese with a mild but tangy taste. This was usually followed by one of their speciality pizzas, the speciality being an extremely thin, crispy base. Italians favour quite simple toppings (no ham and pineapple here!); I often chose the one shown in the photo, a classic tomato and mozzarella base topped with thinly sliced aubergine and courgette.

Living in the UK it's practically impossible to find decent pizza so we started to make our own. The dough is a fairly standard recipe but we roll it out very thinly, thus ensuring a light, crispy base. Our current favourite is a basic margherita base (tomato and mozzarella) with some slices of prosciutto di parma and a few fresh basil leaves strewn over just before eating. However, feel free to add what you like (just don't tell me if it includes pineapple!).

Please don't be put off if you've never done any baking with yeast before. It's really straightforward, does not take hours of kneading and is incredibly rewarding. If you're still reluctant to try, just read through the recipe to see how easy it actually is. You don't need any special equipment apart from a couple of pizza trays and a very hot oven!

RECIPE (makes enough for 3 or 4 pizzas)

For the dough

450g strong white bread flour, plus more for kneading
7g (1 sachet) easy blend yeast
1 teaspoon salt
approximately 300 ml warm water
1 tablespoon olive oil

 Put the flour, yeast and salt in a large bowl and pour in about 200 ml of the water and the olive oil, mixing with your hands. Be prepared to add more water but do it gradually - you don't want it too wet (although it's not a disaster if this happens, just add more flour until you can knead it without it sticking to everything). Start kneading by pushing the dough away from you with the heel of your hand, the fold it back and turn slightly. It's quite hard to explain but very easy to do! Keep doing this for about 10 minutes, it should feel smooth and springy when it's ready.

Form the dough into a ball and rub a little olive oil over the surface, so that it is lightly greased. Put it into a clean bowl, cover with clingfilm and leave in a warm place for at least 2 hours, I've left it a lot longer than this and it doesn't seem to be a problem. The dough should more or less double in size.

When you're ready to make the pizza, preheat the oven to the hottest possible setting  (240°C on mine). Divide the dough into four roughly equal parts (you can weigh them if you want to be really precise) and roll each one out. It may seem far too small to fit into your pizza tray and it will keep springing back first of all but do persevere! (In our house, this is my partner's job - I make the dough, he rolls it out, great teamwork...). If you don't want it that thin, you can divide the dough into three parts rather than four.


TOPPING (per pizza)

About 2 tablespoons of passata
125g mozzarella (I use the normal mozzarella for pizza, not buffalo), thinly sliced
Drizzle of extra virgin olive oil
Dried oregano

Lightly grease the pizza trays and stretch the dough to fit. Then cover with the passata (it should just be a very thin layer), a pinch of salt and a sprinkle of oregano. Add the cheese, drizzle over the olive oil and put in the oven. It takes about 10 minutes to cook but keep an eye on it as all ovens vary. After about 8 minutes, I take the pizza off the tray and slide it back directly onto an oven shelf for the last minute or two.

If you're using parma ham, put it on the pizza after it's been cooked, along with fresh basil. Other meats like cooked ham or salami and toppings like olives, capers, anchovies etc can all be put on the pizza before it goes in the oven. Don't overlook the plain margherita though - when it's homemade like this, it's really delicious!


Eat while it's still piping hot accompanied by a cold beer or a young Sangiovese or Barbera if you prefer wine.