Tuesday, 20 November 2012

Jammie Dodgers (Biscotti alla Marmellata)


I rarely buy biscuits. The long list of ingredients on the side of the packet is enough to put me off and most of them don't taste great either. I make an exception with shortbread - I love it, in all its forms and even the cheapest brands are fairly unadulterated, listing just flour, butter, sugar and salt.

Homemade biscuits however are a completely different proposition. They are a joy, both in taste and to make. There's something very therapeutic about rolling out the dough and then cutting it into pretty shapes, like the star biscuits here. I didn't intend them to be Christmas biscuits, it's just that stars are the only cutters I have with a matching small shape for the open centre. Looking at the photo, I realise that the shape, together with the raspberry red middle, makes them look very festive indeed. I'll certainly be baking these again nearer to Christmas.

This recipe comes from Pam Corbin writing in The Guardian but it is originally from the River Cottage Handbook: Cakes by Pam Corbin. It is similar to shortbread but with the addition of an egg yolk which makes the dough more pliable and the biscuits hold their shape better too. 

As this month's letter is 'J' in the brilliant Alphabakes challenge by Caroline at Caroline Makes (this month's host) and Ros from TheMoreThanOccasionalBaker, I'm sending this as my entry. I always enjoy seeing what everyone comes up with for this imaginative challenge!


RECIPE (from River Cottage Handbook: Cakes by Pam Corbin)  - Makes 6-7

175g plain flour
Pinch of sea salt
75g icing sugar
125g unsalted butter, cut into small pieces
1 egg yolk
1 tsp vanilla extract
150g raspberry jam (or whatever flavour you like)


2 large baking sheets, lined with baking parchment
6–7cm biscuit cutter
2.5cm heart, square, round or animal biscuit cutter

Sift the flour, salt and icing sugar into a large mixing bowl. Add the butter and lightly rub into the flour mix, using your fingertips, until the mixture resembles fine breadcrumbs.

In a small bowl, whisk the egg yolk and vanilla extract together. Make a well in the centre of the flour mix. Add the egg and vanilla mix and work together to form a soft, smooth dough. Seal the dough in a polythene bag and chill in the fridge for 25–30 minutes.

Preheat the oven to 170°C. Divide the dough into two equal portions. Place one portion between two pieces of lightly floured greaseproof paper and, using a rolling pin, roll the dough to approximately a 4mm thickness. Repeat with the second piece of dough. Remove the top paper


With the larger biscuit cutter, cut the dough into discs (make sure you have an even number). Using the smaller cutter, cut out and remove the centre of half the biscuit discs; the cut-out pieces can either be kneaded back into the remaining dough or baked just as they are.

Place all the discs on the baking sheets. Bake for 15–20 minutes until just firm and barely coloured.

Remove from the oven and place a teaspoonful of jam in the centre of each whole biscuit. Spread to 1.5cm from the edge. Place the cut-out rounds on top. Return to the oven and cook for a further 5–6 minutes by which time the biscuits will be evenly cooked and the jam sufficiently hot to stick the biscuits together.

Leave the biscuits to cool for 5 minutes before transferring to a wire cooling rack.


Thursday, 15 November 2012

Chicken cooked in beer - Pollo alla birra


I'm the first to admit that this does not look particularly appealing but you'll have to trust me. It's a fantastic dish, really easy and tastes delicious. It's a staple in our house.

The origins of the dish are slightly obscure but the general consensus is that it comes from Belgium. Be that as it may, it's a very common dish in northern Italy and this recipe comes from my father-in-law, Giuseppe who's been cooking it for years. 

Be careful with the beer you use. I used to make it with whatever I had to hand but some beers, particularly standard lagers, leave a decidedly bitter taste when cooked. The one that I've found works best is Leffe but some real ales work well too.

RECIPE - Serves 3-4
9 chicken pieces, thighs and drumsticks work well here
500 ml beer - read note above
Plain flour for dusting chicken
1 stick celery
1 carrot
1 onion
Olive oil
Salt and pepper

Chop the onion, celery and carrot very finely (I usually just pulse them in a food processor). Then fry gently in a little oil for about 5 mins until softened. Remove the vegetables to a plate.
Season the chicken pieces with salt and pepper, then dust the chicken with flour, knocking off any excess.
Add a little more oil to the pan and fry the chicken until golden brown on all sides.
Put the vegetables back in the pan with the chicken. Pour in the beer (it won’t cover the chicken completely), put a lid on and cook gently for about 35 mins.
When the 35 mins are up, remove the lid, turn up the heat and cook for a further 5-10 minutes until the sauce has reduced. Check the seasoning.
Serve the chicken with the sauce poured over, a crisp green salad on the side and lots of crusty bread  for mopping up the sauce.

Monday, 12 November 2012

Chicken stuffed with goat's cheese and herbs


I dream of having a big kitchen, the kind where people can sit and chat, read the newspaper with a cup of coffee, lend a hand with the cooking without getting in the way... My kitchen is small. I'm not complaining (although it may sound like it) because it's perfectly formed and fulfils its function very well. It's just that when I have friends and family over for dinner I have two choices - I can either prepare everything in advance which allows me to take part in the conversation happening in the dining room or I can cook there and then which means that I miss out on everything else that's going on.

Needless to say, I usually prefer the first option, that of preparing most things in advance, thus maximising time spent with my guests. This chicken dish (the inspiration for which comes from an old Good Food magazine) fits the bill on many counts. Firstly, it can all be prepared ahead of time and simply put in the oven when needed. Secondly, the chicken is cooked on a bed of courgettes and tomatoes which means that you can dispense with a separate vegetable, leaving you with less to do in the kitchen and minimising the washing up. This method of cooking also ensures that the chicken stays nice and moist. Finally, and most importantly, it's delicious, with a great balance of flavours - crisp saltiness from the pancetta, creaminess from the cheese and mild sweetness from the vegetables.

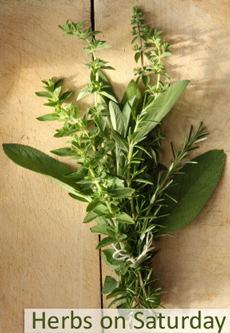
The thyme and oregano used in this dish mean that it can be sent to one of my favourite challenges, Herbs on Saturday, created by Karen from the inspirational Lavender and Lovage and hosted this month by Jen at Blue Kitchen Bakes .

Herbs on Saturday

I'm also sending this over to Javelin Warrior's weekly challenge, Made with Love Mondays which encourages us all to cook from scratch and provides a fascinating, eclectic mix of recipes to try every week.
 
JWsMadeWLuvMondays

RECIPE - serves two

2 skinless, boneless chicken breasts
100g firm goat's cheese
a few sprigs of fresh thyme
1 teaspoon dried oregano
6 slices of pancetta (or thinly sliced streaky bacon)
2 courgettes, thinly sliced lengthways
1-2 tbsp extra virgin olive oil, plus extra for drizzling
250g tomatoes, any kind, thinly sliced


Pre-heat oven to 190°C.

Slice the chicken breasts almost in half from one long side and open them out like a book. Cover with cling film and bash with a rolling pin to  flatten them. Season on all sides. Put half the goat's cheese on each piece of chicken and sprinkle with some of the thyme leaves and oregano. Roll the chicken up to enclose the cheese, then wrap each one snugly in three slices of pancetta.

Lightly oil a shallow gratin dish, then arrange overlapping rows of courgettes and tomatoes over the base. Drizzle with olive oil and sprinkle with salt, pepper and thyme sprigs. Place the chicken breasts on top.

Bake for 45 mins until the pancetta is crisp and golden and the courgettes are tender. Cut in half diagonally if you so wish and serve with new potatoes or good bread.

Wednesday, 7 November 2012

Butternut Squash Soup with chilli and herbs


I love cooking with butternut squash (as long as I don't have to peel it). The intense colour when you cut it in half always comes as a surprise and magic occurs with the heat of the oven, transforming the hard, unyielding flesh into soft, sticky sweetness. Even its name sounds delicious.

This soup is perfect for November - the vibrant orange adds colour to a grey day, the squash makes the soup satisfyingly filling but still silkily smooth, the herbs give freshness and the chilli really warms you up from the inside.

As squash is still very much in season, I'm sending this over to Ren at Fabulicious Food for her wonderfully inspiring Simple and In Season challenge.


I'm also sending this over to Javelin Warrior's weekly challenge, Made with Love Mondays which encourages us all to cook from scratch.

JWsMadeWLuvMondays

The herbs used in this dish mean that it can be sent to another of my favourite challenges, Herbs on Saturday, created by Karen from the consistently wonderful Lavender and Lovage and hosted this month by Jen at Blue Kitchen Bakes .

Herbs on Saturday

RECIPE - serves 4

1 butternut squash
1 onion
1 clove garlic
2 tablespoons olive oil
40g butter
dried chilli flakes, (a pinch or two, depending on how hot you want it)
2 sage leaves, finely chopped
900ml vegetable (or chicken stock)
a handful of fresh coriander

Pre-heat the oven to 220°C

Cut the unpeeled butternut squash in half, from top to bottom and deseed it. Make a few cuts in the flesh with a knife and drizzle with some olive oil. Place on a roasting tray and roast for about 40 mins until soft.

In the meantime, finely chop the onion and garlic. Heat the oil and butter in a saucepan and soften the onion and garlic slowly over a gentle heat. It's important to do this slowly as you really don't want the onion and garlic to burn or even colour. After about 20 mins the onion should be soft and translucent.

When the squash is cool enough to handle, scoop out the flesh (discarding the skin) and add it to the softened onions and garlic, together with the sage, chilli and stock. Bring it to the boil and cook for a few minutes before removing from the heat.

With a stick blender, blitz until smooth and check the seasoning. It will probably need both salt and pepper, depending on the stock you have used and personal taste.

Put the soup back on the hob to heat up thoroughly. Serve with generous quantities of fresh coriander and a drizzle of crème fraîche.


Thursday, 1 November 2012

Pane dei Morti


Italy has never really had a Halloween tradition per se; the important days at this time of year are Ogni Santi, All Saints' Day, on November 1st and Il Giorno dei Morti, All Souls Day, on November 2nd. During these celebrations, you won’t find costumes, scary decorations or children trick-or-treating on the street. Instead, people go to mass to pray for the deceased, followed by the cemetery to visit their loved ones and bring flowers and candles to their graves.

As with other feste in Italy, each region makes their own particular delicacies on these occasions. Pan dei Morti, or Bread of the Dead, are dark, spicy, chewy biscuits, originally from Lombardia, that are sold in bakeries around this time although they disappear after November 2nd. They are usually eaten after dinner on Ogni Santi and Il Giorno dei Morti. The biscuits, in common with many traditional Italian baked goods, are quite dry but full of complex flavour: cocoa, cinnamon, pinenuts, figs, raisins, wine, ancient flavours that have been used for celebratory occasions for hundreds of years. These are biscuits firmly rooted in Italy's past which is perhaps why they remind Italians of their ancestors.

I won't deny that there is a long list of ingredients and the method, though simple, is rather long-winded and fiddly. However, I think they are worth the effort...

Auguri per Ogni Santi.

RECIPE

100g amaretti
250g sponge fingers
150g dry biscuits (I used gingernuts but Rich Tea would be good too)
50 g cocoa powder
250g plain flour, 00 if possible
120g dried figs
60g blanched almonds
60g pine nuts
300g caster sugar
6 egg whites
120g raisins
100 ml vin santo or other sweet wine
10g baking powder
1 teaspoon cinnamon
some freshly grated nutmeg

First, put the raisins in some hot water to plump up.

Put all the biscuits (amaretti, sponge fingers, other biscuits) in a food processor and blitz to make crumbs. Transfer to a large mixing bowl.

Next, blitz the almonds, dried figs and pine nuts together and put in the mixing bowl with the biscuit crumbs.

Add all the other dry ingredients to the mixture and mix well. Finally, drain the raisins and add to the mixing bowl, together with the baking powder, sweet wine and the egg whites.

Start to mix it all together. It's extremely sticky so it's easiest to do this by hand (I wear latex gloves to make this a bit easier).

When the mixture has come together, transfer to a floured board and form a loaf shape. Using a sharp knife dipped in flour, cut vertically into 1 cm thick slices.

Using your hands, form the slices into vaguely lozenge-shaped biscuits.

Put them on a baking tray lined with greaseproof paper, leaving room for them to expand slightly as they cook.

Bake in the oven for 25 mins.

Remove from the oven and transfer to a wire rack to cool, dredge generously with icing sugar before serving.

They last very well for 4-5 days in a cake tin and go very well with a glass of vin santo.


Wednesday, 31 October 2012

Witches' Fingers


I felt that a little something was needed to celebrate Halloween so here are my witches' fingers. As you can see from the photos, the witches in question were rather more voluptuously shaped than the ones we are used to seeing in fairy tales which makes their plump fingers somewhat less scary than the more traditional long, thin digits. However, the bleeding, severed fingers look suitably macabre for Halloween, I feel and I particularly like the yellow, thickened almond fingernails. For a more grotesque effect, you could add some green food colouring to the dough.

I'm sending this over to Javelin Warrior's wonderful weekly challenge, Made with Love Mondays.

JWsMadeWLuvMondays


RECIPE (from GialloZafferano)

280g plain flour
100g icing sugar
100g cold butter, diced
1 egg
1 level teaspoon baking powder
a pinch of salt (only if using unsalted butter)
a teaspoon vanilla extract

whole blanched almonds for the fingernails
raspberry/strawberry jam for visual effects

Pre-heat the oven to 180°C

Put all the ingredients in a food processor and blend with the blade attached until the mixture starts to come together to form a paste. (If you don't have a food processor, just rub the butter into the dry ingredients, then add the egg and mix well until combined).

Turn the mixture out onto a board and work it with your hands until you have a smooth ball of dough. Break off a portion of dough and roll into a long, thin finger shape. Place an almond on the tip, shaping the finger around it. Using the back of a knife or a toothpick, make wrinkles under the nail and on the knuckle area.

Repeat with the remaining dough. Place the fingers on a baking sheet lined with parchment. Bake for about 20-25 mins or until the fingers are pale gold.

Leave to cool on a wire rack.
Wednesday, 24 October 2012

Chocolate and Pumpkin Cake


I feel I must start with an apology - this is the second chocolate cake I have written about in less than a month (click here for mini chocolate cakes with nutella cream). However, as the cakes are completely different in terms of taste, texture and when you would want to eat them, I think that its inclusion here is justified. The seasonal use of pumpkin is another reason for adding it to October's recipes.

Although most people are familiar with pumpkin in tarts and pies, it may seem an odd ingredient in a cake. However, please don't be alarmed. This cake is wonderful, combining a fudgy, moist texture and a rich, chocolatey flavour with a hint of spiciness thanks to the pumpkin. It is not overly sweet and although it looks quite dense, it actually isn't. It is perfect as an Italian breakfast cake or as a mid-morning/mid-afternoon snack with a cup of coffee and it keeps brilliantly. It is quite a plain-looking cake but I rather like that. You could ice it though with a vanilla scented cream cheese icing, the sort you would use on a carrot cake.

The origins of this cake lie in Mantova, a fairy-tale city that seems to rise out of the lakes that surround it. It is at its best at this time of year when the mist adds an ethereal quality and with both the tourists and mosquitoes gone, you can wander freely around the magical, historic centre, stopping for an espresso in a cafe on the cobbled square. The region is famous for pumpkins - you find them in everything, from the famous tortelli, where they are used, along with crushed amaretti, to make the filling to pies, cakes and biscuits.

I'm sending this over to We Should Cocoa, the monthly blogging challenge, started by Choclette of Chocolate Log Blog and Chele of Chocolate Tea Pot, which each month selects an ingredient or theme to be paired with chocolate. This month's theme is Pumpkin, hosted by Hungry Hinny.


I'm also sending it to Nazima (formerly of Working London Mummy) at her wonderful new home Franglais Kitchen. She is this month's host of The One Ingredient Challenge (Pumpkin and Squash), run jointly with Laura at How to Cook Good Food. She is also hosting the Simple and In Season challenge, run by Ren of Fabulicious Food.


Last but not least, I'm sending it to Javelin Warrior's wonderful weekly challenge, Made with Love Mondays.

JWsMadeWLuvMondays


RECIPE

350-400g pumpkin, after removing skin and seeds, roughly chopped
200g self raising flour
4 eggs
200g caster sugar
100g butter, melted
40g cocoa powder

Pre-heat the oven to 180°C

Grease and base line a round cake tin, 24cm diameter

Start by making the pumpkin puree. Place the chopped, skinless, seedless pumpkin in a steamer and steam for about 30 mins or until soft. Blend (or mash) to a smooth puree.


Put the eggs in a bowl with the caster sugar and whisk (preferably not by hand!) until thick and voluminous.

Sieve in the flour and cocoa powder and mix gently. Then add the melted butter and the pumpkin puree, whisking all the time until everything is smoothly amalgamated.

Pour the batter into the tin and bake for about 45-50 mins. If it starts to burn on top, cover loosely with foil.

Leave to cool for about 20 mins before turning out of the tin onto a wire rack.

Serve dusted thickly with icing sugar.


Sunday, 21 October 2012

Puglian Broad Bean dip - Purea di Fave


Months ago, GL's parents gave us a precious bag of dried, skinned, split broad beans from Puglia, precious because I have yet to find these pale skinned beans in the UK. Once a staple of la cucina povera, 'peasant cooking', made into a puree and traditionally served with a boiled green vegetable, it is now more often found gracing the tables of chic local restaurants as part of the groaning antipasti table or served instead of the pasta course, as a primo. Don't be put off by the simplicity of the recipe - although the beans in their pallid, wrinkled, uncooked state don't seem to promise anything good, the transformation that takes place with what is basically no more than the addition of water and an onion is incredible. The puree is creamy and satisfying, with the subtle taste of the beans taking centre stage. It really is so much more than the sum of its parts.

I had intended to cook this months ago in my first flush of enthusiasm after receiving the beans. However, the need for overnight soaking meant that I couldn't just cook them whenever I felt like it and they gradually got pushed to the back of the cupboard. It was with joy then that my hand fell upon these as I was having a rummage in order to (finally) participate in this month's Random Recipes Challenge from Belleau Kitchen, Store cupboard Finds. Unfortunately, I know that only one of my cookery books has recipes using dried broad beans - La Cucina Salentina, a small publication I bought whilst last on holiday in Puglia. It has two recipes using this ingredient, a soup and this puree - I opted for the puree as I have always wanted to try making it at home and I must say, I was not disappointed. My only problem now is where to get more of these elusive beans...


RECIPE - taken from La Cucina Salentina

Ingredients
400g dried, skinned, split broad beans
1 small onion, sliced
extra virgin olive oil


Rinse the beans, put them in a large bowl or pan and cover them with cold water. Leave to soak overnight or for at least 10 hours.

Drain the beans and rinse them again under the tap. Place in a large pan, cover with cold water and bring to the boil over a medium heat, skimming off the foam as it rises to the surface. Add the sliced onion, lower the heat and part cover. Cook at a gentle simmer for about one hour, topping up with hot water if the beans start to run dry. When the beans are very soft and starting to disintegrate, remove from the heat and season with 1-2 teaspoons of salt.

Leave to cool slightly and then puree the beans with a stick blender until smooth or the consistency that you prefer - I like them with a bit of texture. Stir in a tablespoon of extra virgin olive oil and add a little water if you prefer a looser puree. Adjust the seasoning to taste. I also add some dried chilli flakes.

Serve with a drizzle of olive oil and some wilted spinach or with warm toasted bread if you prefer the non-traditional route.

Wednesday, 17 October 2012

Chilli Jam


I have always loved the idea of having a larder stocked with home-made jams, preserves and chutneys but in reality, the demands of a full-time job don't leave me much time for this type of cooking. However, since moving into our new house a few years ago, I have managed to make at least a few jars of chutney each year, spurred on by a reluctance to waste the windfalls from my apple and pear trees if I didn't. The whole operation of chutney-making was so much simpler than I had imagined (apart from my almost OCD obsessiveness about sterilising the jars) that I was encouraged to try my hand at some other preserves.

Although marmellata di peperoncino originally comes from Calabria, famous for its powerful chillies, I first tried this chilli jam in a trattoria in Tuscany. It was one of those rustic places, without pretension, all wooden tables and brown paper mats, serving plain but delicious local food. We had platters of Tuscan meats and cheeses - cinta senese (a rare breed of pig from the Siena area) salami, wafer thin slices of finocchiona, a wonderfully scented salami flavoured with fennel seeds, silky slices of lardo di Colonnata produced from pigs that dine on acorns and chestnuts served on chunks of warm toasted bread, ash-covered wedges of pecorino from Pienza ... The chilli jam accompanied the cheeses and it was perfect, not only, as I had expected, with the more mature ones but also combining wonderfully with the young, fresh pecorino.

My version comes from Nigella's Christmas book. I have tried others but this is my favourite - it's so simple yet yielding fabulous results. I love the clear, vibrant red jelly, with its fragments of chilli floating inside. Don't save it just for the cheese board though - it goes wonderfully with bacon sandwiches, burgers cooked on the barbecue, grilled chicken, cold meats...

You can find Nigella's recipe here (http://www.nigella.com/recipes/view/chilli-jam-2692).


Tea Time Treats Blogging Challenge

I'm sending this over to the amazingly alliterative monthly blogging challenge Tea Time Treats hosted by Karen (of the inspirational Lavender and Lovage) and Kate (from mouth-watering What Kate Baked)  - the theme is Jam, Chutneys, Curds and Conserves. Kate is this month's host and having seen both her entry and Karen's, I'm sure it's going to be a fantastic round-up!


Sunday, 14 October 2012

Mini Chocolate Cakes with Nutella Cream

Mini chocolate cakes with Nutella Cream
It is a truth universally acknowledged (sorry, but October is the time of my annual rereading of Pride and Prejudice) that everybody loves chocolate cake and these little, individual sized ones are impossible to resist. The cake part is a standard chocolate sponge but the thing that makes these a real winner is the nutella cream sandwiched in the middle. It looks and tastes like a chocolate crème patissière that you've been slaving away over for the best part of an hour but is actually whipped up in less than a minute and is nothing more than nutella mixed with mascarpone. I know it sounds odd but it really works and I speak as someone who is not a great fan of either - I mean, I eat both mascarpone and nutella when the occasion requires but I don't go wild over them (unlike several of my acquaintances).

I made the mini chocolate cakes by baking the mixture in two round 18 cm cake tins, then just cutting out circles with a scone cutter when the cake had cooled, slicing them in half and sandwiching with the cream. You could of course leave it as a normal sized cake, slicing each disc in half and then layering it all up with the nutella cream.

As this month's letter is 'N' in the brilliant Alphabakes challenge by Ros (this month's host) from TheMoreThanOccasionalBaker and Caroline at Caroline Makes, I'm sending this as my entry. I always enjoy seeing what everyone comes up with for this imaginative challenge!


RECIPE
For the cake
Weigh 3 eggs in their shells, then measure out the same weight of:
butter
caster sugar
self raising flour, minus 50g
50g cocoa powder

For the cream - this quantity makes enough for one layer of filling
150g mascarpone
100g nutella
a few drops vanilla extract

Two 18cm cake tins, greased and base lined with baking parchment.
Pre-heat the oven to 180 °C .
Cream the butter and sugar. Add the eggs one at a time, whisking well between each addition. Fold in the sifted flour and cocoa powder.
Pour the mixture into the prepared cake tins. Bake for about 20 minutes, or until a cake-tester (be it a knitting needle, metal skewer or anything else you might use) comes out clean.
Leave in the tin for about 10 minutes before turning out on to a wire rack to cool.
While the cakes are cooking and cooling, you can make the cream. Just put the mascarpone into a bowl and whisk until smooth. Add the nutella and the vanilla extract and keep whisking until it's all mixed together.
When the cake is cool, use a cookie cutter to cut out rounds. Split them in half and sandwich with the nutella cream.

Before serving, dust with icing sugar. 

Monday, 8 October 2012

Chocolate and Chilli Mousse


A sixties bistro classic, chocolate mousse has endured the vagaries of culinary fashion to become a perennial favourite. This is a classic version with a modern twist in the form of chilli.

I've tried lots of recipes for chocolate mousse over the years, some with butter, others with cream, but I don't think you can beat the simplicity of the original French version - just chocolate and eggs. You can add any flavours you like to this basic recipe - vanilla, coffee, brandy, it's really up to you. I personally love the subtle kick of chilli that comes through the intense, rich chocolate.

This is the one place that I don't use chocolate with more than 70%  cocoa solids as it is much harder to incorporate into the egg whites and has a tendency to turn grainy. In fact I find that a dark chocolate with about 50% cocoa solids is about right here - it mixes in perfectly and the extra sweetness works well because the recipe doesn't include any sugar.

I love this with some extra thick double cream spooned over the top - the bland, cool cream is a perfect foil for the rich, spicy mousse.


RECIPE - serves 4 normal-sized portions or 8 mini ones (see photo)

200g dark chocolate (see note above)
4 eggs, separated
a pinch of chilli flakes (see note above)

Begin by melting the chocolate. You can do this in the microwave (just go gently) or in the traditional way by breaking the chocolate into pieces and putting in a bowl over, but not touching, a pan of simmering water. When the chocolate begins to melt, turn the heat off. Stir until smooth.

Beat the egg yolks and add them to the melted chocolate while it's still hot. Mix thoroughly. At this point you can add the chilli flakes or any other flavours you're using.

Whisk the egg whites into soft peaks. Spoon about a third of the egg whites into the chocolate mix and whisk in. Fold the rest very gently into the mixture until just combined (be careful not to overmix), and then put into bowls or glasses and refrigerate for at least four hours until set.


Tuesday, 2 October 2012

Pear, prosciutto and blue cheese salad


This salad is perfect for autumn; it's still (just) warm enough to want to eat salads but this also provides the big, hearty flavours that I start to long for at this time of year, making you feel full and satisfied.

Pears, blue cheese and prosciutto are a classic combination that never fails to please so this salad is worth bearing in mind for a quick starter if you've got friends coming over for dinner. It works really well as a lunch dish too. A delicious vegetarian version can be made with minimal fuss - just dispense with the prosciutto (obviously) and sprinkle over some roughly chopped walnuts.

A note on ingredients - I used Perl Las when I last made this - it's an organic cheese from Carmarthenshire with a strong but creamy flavour and those unmistakable blue overtones. It works particularly well in sauces and salads but you can substitute it with any strong blue cheese you happen to have. The best pears to use are the harder variety ones here; this is not the place for very ripe, mushy pears. My favourite ones in salads are Conference pears.

As you can see from the photo, it does have an undeniable 'eighties' look to it. However, I don't think that this is anything I should apologise for - it tastes great and that's what counts.

I'm sending this over to Nazima and Pierre at their wonderful new blog, Franglais Kitchen - they're hosting this month's Simple and In Season challenge, started by Ren from Fabulicious Food.


RECIPE - serves 4 as a starter

2 pears
100g prosciutto
50g blue cheese
50g single cream
Salad leaves

Wash the pears and cut into quarters, removing the core. Then cut each quarter in half again, giving you eighths.
Wrap prosciutto round each segment of pear - I find that half a slice of prosciutto is enough for one segment.
Melt the cheese and cream gently in a pan, being careful not to let it boil. It should be a pouring consistency - if it's too thick you can add a little milk or even water to thin it slightly.
Put a handful of salad leaves on a plate, arrange the prosciutto-wrapped pears on top and then drizzle over the sauce. It doesn't need any salt because of the blue cheese.


Wednesday, 26 September 2012

Herby trout with potatoes


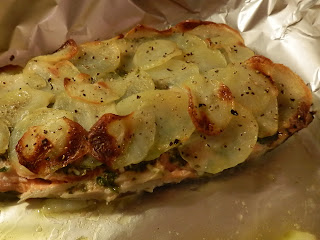
Before I write about this dish, I feel I have to come clean about its origins. GL devised the recipe and indeed cooked it for the photo above so I cannot claim any credit for it. However, I have a feeling it will become a staple as it worked so beautifully on every level. The fish, protected by the herbs and potatoes stays wonderfully moist, the herby layer gives the fish a fresh lift and the potatoes provide a crunchy texture to contrast with the softness underneath.

This post is making its way over to one of my favourite challenges, Herbs on Saturday, created and hosted by Karen from the wonderful Lavender and Lovage http://www.lavenderandlovage.com/2012/09/herbs-on-saturday-september-challenge-win-a-copy-of-herbs-river-cottage-handbook.html.

Herbs on Saturday    

RECIPE - serves 2

2 trout fillets
a large handful of fresh parsley
1 clove garlic
2 teaspoons capers
4 medium sized, waxy potatoes
extra-virgin olive oil

Pre-heat the oven to 180 °C .

Peel the potatoes and parboil for about 10 minutes. Allow to cool slightly (so you don't burn your
hands) before slicing thinly.

While the potatoes are cooking, make the herb mixture. You do this by whizzing the parsley, garlic and capers in a blender with about a tablespoon of olive oil until smooth. Season with a generous quantity of freshly-ground black pepper and add salt to taste.

Drizzle some oil in a roasting dish so that the fish doesn't stick - GL lined it with foil as well. Place the fillets on top, spread with the herb mixture and top with the thinly sliced potatoes. Drizzle liberally with olive oil and place in the oven for about 25 minutes. When done, the fish should be cooked but still moist and the potatoes should be crisp and golden brown.


Monday, 24 September 2012

Apple and Walnut Cake

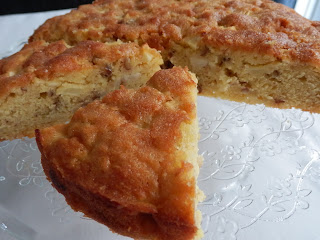
Apple and Walnut cake

I first came across this kind of apple cake in Italy - I spotted it in a bakery, sitting proudly and invitingly on a wooden board under the glass counter, plump with the promise of fragrant, moist apple. Not being able to resist, I bought a generous slice and devoured it as soon as I reached home. It did not disappoint, the apple ensured that it was not dry like many other types of cake in Italy and the addition of cinnamon gave a spicy contrast to the sweetness.
I have since made it many times at home, varying it slightly as the mood takes me. For some reason I like to include walnuts if I make it as one, large round cake but I prefer to leave them out when making individual cupcakes (see here for that recipe).
Although the poor summer has had an adverse effect on a lot of fruit and vegetables this year, my apple harvest is fantastic, the trees groaning with fruit. I used one cooking apple and two red apples for this but you can use whatever you happen to have to hand.

I'm sending this to Katie Bryson from the lovely blog Feeding boys and a firefighter, who is this month's host of the Simple and In Season challenge, the brainchild of Ren at Fabulicious Food.


I'm also sending it to Javelin Warrior's wonderful weekly challenge, Made with Love Mondays.
JWsMadeWLuvMondays


RECIPE

150g butter
180g caster sugar
180g self raising flour
1-2 teaspoons cinnamon (depending on taste)
3 eggs
3 apples
40g walnuts

Pre-heat the oven to 180°C

Grease and base line a round cake tin, 22cm diameter

Peel and core the apples. Chop into small dice. Roughly chop the walnuts.

Cream the butter and sugar together. Add the eggs one at a time, whisking well after each addition. Sieve the flour and cinnamon and fold in, then add the apples and walnuts, stirring well to combine.

Spoon the mixture into the prepared tin, smoothing the top.


If you want a slightly crunchy top, you can sprinkle over a spoon of demerara sugar just before it goes into the oven.

Put in the oven and bake for about 30-35 mins or until the cake is cooked and golden brown on top. It takes slightly longer to cook than a normal sponge cake because of the addition of moist apple.

Remove from the oven. Take the cake out of the tin as soon as possible (without burning yourself of course) and leave to cool on a wire rack.


It is absolutely heavenly eaten still slightly warm from the oven but it also keeps very well because the apple helps the cake stay deliciously moist.

Apple Cake


Monday, 17 September 2012

Risotto ai funghi


To my mind, mushroom risotto heralds the start of autumn and although there are a still a few days to go until summer officially ends, the crisp, bright mornings, the dark evenings and the golden leaves falling from my silver birch tree have instilled in me a 'mists and mellow fruitfulness' kind of mood. It was either risotto-making or putting away my summer clothes and I don't feel quite ready to take that step yet.

Risotto ai funghi is an Italian classic. The best versions are made with the king of mushrooms, fresh porcini, which are coming into season right now. They have an incredibly rich, aromatic, almost meaty flavour that is vigorous enough to withstand a fair amount of cooking. However, while I would love to be able to say that this risotto was made with porcini that I picked on a walk in the woods yesterday, it would not be true. I have never yet found any in this area but I am convinced that they do grow here as conditions are surely perfect. There is no need to despair however as a delicious risotto can be made with a combination of dried porcini (which you can fortunately buy everywhere) and some fresh chestnut mushrooms added towards the end of the cooking time.

I always have a packet of dried porcini in the larder as their intense mushroomy flavour not only makes a fantastic risotto but also adds instant 'umami' to a whole variety of sauces and stews. The other ingredient that turns this risotto into something special is a porcini stock cube. I hardly ever use stock cubes but I make an exception for these (dadi Star ai Funghi Porcini) as they add a real punchy flavour. I usually stock up when I'm in Italy because they are not easy to find in the UK but happily, Carluccio's has recently started selling them.

I'm sending this to Katie Bryson from the lovely blog Feeding boys and a firefighter, who is this month's host of the Simple and In Season challenge, the brainchild of Ren at Fabulicious Food.


RECIPE
Serves 2 generously

1 shallot (or half an onion), finely chopped
1 clove garlic, finely chopped
30g dried porcini mushrooms
50g butter
1 teaspoon olive oil
1 glass dry white wine
1 litre mushroom stock (made with porcini stock cube, see above)
250g carnaroli or arborio rice
200-250g chestnut mushrooms
generous grating of fresh parmesan
Put the dried mushrooms to soften in a jug of warm water for about half an hour.

Take the mushrooms out of the water (but make sure you don't throw it away as you will need it later on) and rinse them well, making sure there are no tiny particles of grit or soil left lurking in any crevasses. Chop them roughly but don't make them too small. Filter the mushroom water by pouring it through a sieve lined with a sheet of kitchen towel. You can add this to the stock.


Heat a tablespoon of olive oil and the knob of butter in a pan and add the finely chopped shallot and garlic. Cook over a gentle heat until soft, making sure they do not start to burn. Add the dried porcini mushrooms and carry on cooking for a few minutes.
Tip in the rice and stir well so that all the grains are coated in the buttery juices. Turn up the heat to medium and pour in the wine. Keep stirring until it is absorbed.

Start adding the stock, a ladleful at a time, making sure it is all absorbed before adding the next, stirring all the while to make sure the rice doesn't start to stick.
In the meantime, roughly chop the chestnut mushrooms and fry in a separate pan with a little oil until golden brown.

The rice should be cooked after about 18-20 minutes (it should still have a slight 'bite' to it). You might not need all the stock or you may need a little more (you could just add boiling water). Stir in the cooked chestnut mushrooms at this point.

Add a generous knob of butter, stirring all the time so that it melts into the risotto and the texture becomes creamy. You can also beat in the parmesan at this point or you can sprinkle it over just before eating if you prefer.

Tuesday, 11 September 2012

Bakewell Slice


After a week back at work, my gloriously long holiday in France spent wandering around sun-filled medieval villages, eating exquisite pastries and sampling lots of local specialities is rapidly becoming but a distant memory. I need something that will serve the dual purpose of prolonging my French holiday feeling and providing a little treat that will enliven my lunch box and therefore, my working day. If you're feeling generous, colleagues will no doubt appreciate having a plate of homemade sweet treats too.

This recipe from Nigella (taken from her fantastic book 'Feast') for Bakewell Slices fits the bill perfectly. It may seem odd that such an English tart evokes memories of France for me but frangipane is so ubiquitous in French pastries that, in my mind, it is inextricably linked to that country. (Interestingly, Alan Davidson's fantastic tome 'The Oxford Companion to Food', tells us that although frangipane originated in France, first appearing in a French cookery book of 1674, the name actually comes from an Italian aristocrat, Don Cesare Frangipani.)

Be that as it may, I love anything with that sticky, sweet, almondy filling. A real Bakewell Tart is a thing of joy but it takes more effort to make and is best served as pudding. This recipe, as Nigella states, is an easy option as there is no pastry involved but it still delivers the gorgeous combination of buttery almond and jam. The base is Nigella's very rich shortbread but I've slightly adapted the filling, by using three whole eggs plus one yolk and I add a few drops of French almond extract to really intensify the flavour.

As these are perfect for a packed lunch (albeit a slightly decadent one), I'm entering this into the fabulous Forever Nigella challenge started by Sarah at http://blog.maisoncupcake.com/forever-nigella and hosted this month by Nazima http://www.workinglondonmummy.com/2012/09/forever-nigella-september-packed-lunch.html - thank you both for a lovely challenge.


RECIPE (apapted from Nigella's recipe in 'Feast')

For the base
225g plain flour
60g icing sugar
225g butter (I prefer to use salted butter for this but you can use unsalted if you prefer, adding a pinch of salt to the mix)

For the filling
150g butter
3 eggs
1 egg yolk
150g caster sugar
150g ground almonds
60g flaked almonds
325g jam
a few drops of almond extract

A baking tray, about 23x30x6cm, greased and base lined with baking parchment.

Pre-heat the oven to 180 °C .


Whiz the flour and icing sugar in a food processor, add the butter and process again until you have a crumbly mixture just coming together. Press into the tin, forming a thin layer on the bottom. Cook in the oven for 20 mins.

For the filling, melt the butter and allow to cool slightly. Put the eggs, the yolk, sugar and ground almonds in a processor and whiz together.

Take the base out of the oven, allow to cool for a few minutes before spreading with the jam. Add the melted butter and the almond extract to the other ingredients in the processor, keeping the motor running as you do so.

Pour the mixture over the jammy shortbread, top with the flaked almonds (you can toast these beforehand in a pan if you so wish) and bake for 35 minutes.

Allow to cool before cutting into slices.